Showing posts with label Twist Frame Die. Show all posts

Monday, May 6, 2024

You're lookin' sharp birthday card by Sharon Caudle

 Hello AI Fans!

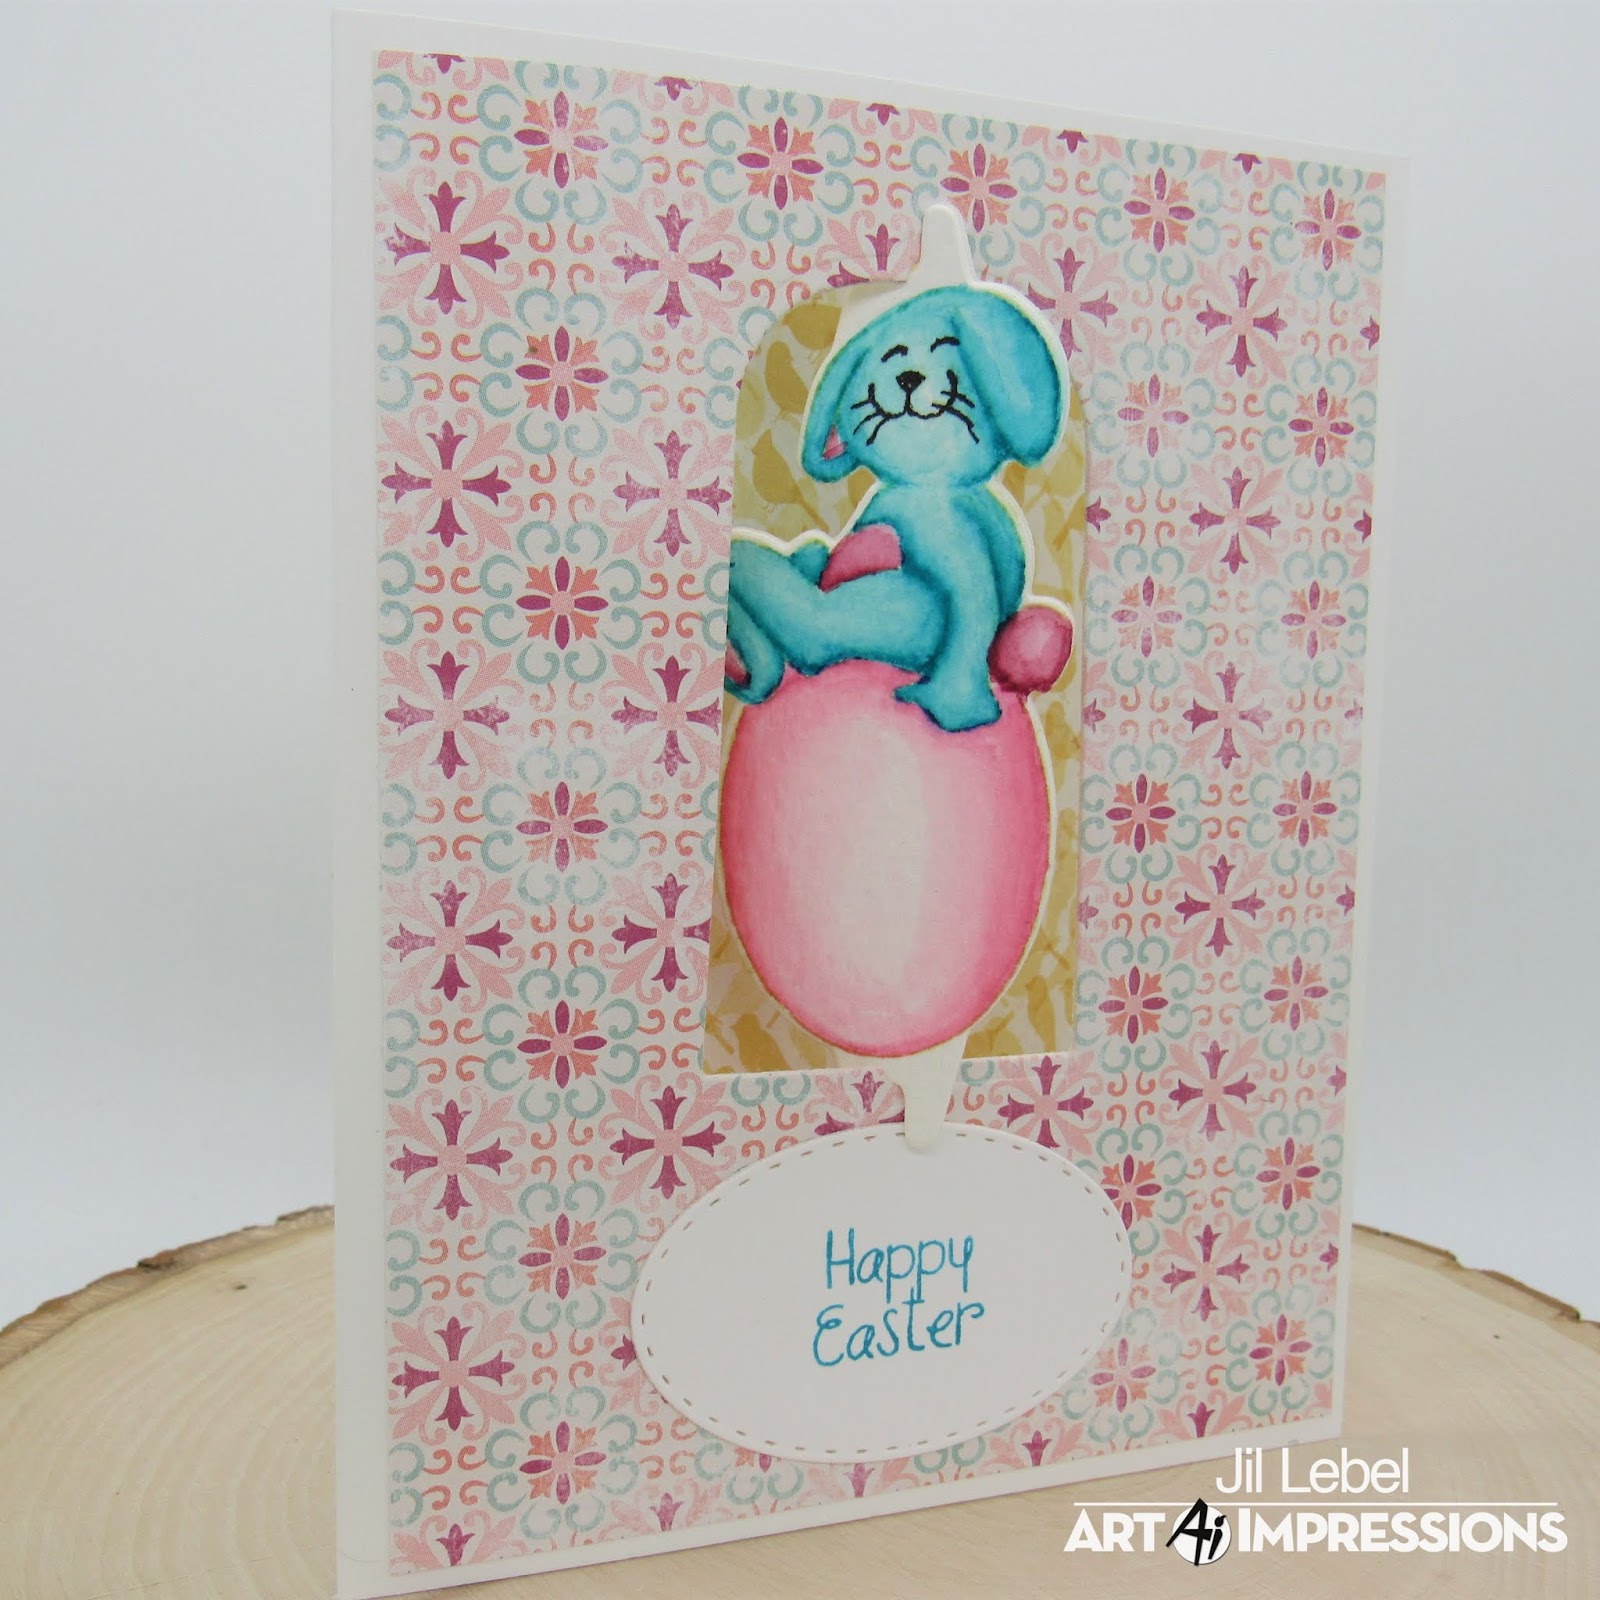
I've got another card for you today featuring the adorable 5112 Hedgehogs Set from the Art Impressions Funny Farm Line! I just think this set is so cute and can just see them popping all their balloons at their birthday party!! I love how all the confetti is sticking to him too! LOL!  I stamped the image onto cryogen white paper and colored it with Copic markers (colors are listed below). That fun birthday sentiment is from 5218 Twist Frame Die set which is on sale right now! I also used 5061 Square Double Stitched Dies and 5723 Journal Cover & Bookmark Dies. I just extended the die to the length I needed. 


Thanks so much for stopping by and until next time - stay crafty!!


Copics used:
E21, 23, 30, 31, 33, 35, and 37
V12, 15, and 17
RV32 and 35
Y35
YG05
R12
B00


Sunday, January 30, 2022

Floral Twist cards by ReneƩ Matarese

 Hello Ai fans!

Today I'm sharing three cards that I made for the Shimmy & Shake challenge going on right now on the Art Impressions blog.


The thank you verse came from the 5266 – Greenery Invites set.


All 3 of my cards used the same stamp and die sets.  I used 5218 – Twist Frame Die and the 5213 – Floral Twist Set.  These Twisters are so much fun.  They can be used as intended like I've shown.  They can also be used as a regular stamp too.  Ai is great for it's versatility! 


Copics used:
R01, R12, R56, YG0000, YG03, YG13,
YG21, BG0000, BG45, BG95

Tuesday, October 5, 2021

Santa Twister Mini Slimline Card


Hello Ai fans!

I'm back on the Art Impressions blog after a short break.  I have really been wanting to make some Christmas cards and Ai has a bunch of great images to choose from. I used the Santa Twist Stamp and Die set along with the Twist Frame Die to make this interactive Mini Slimline card. 
I started by stamping the images onto Spectrum Noir Ultra Smooth card stock with Gina K Black Amalgam ink and colored them with Copic markers.  The colors I used will be listed at the end of this post.  I then cut the images out with the matching dies that come in the set.
 I stamped the greeting onto a thin strip of white card stock using Versafine Clair Nocturne ink. 
I make a mini slimline card with white card stock.  It measures 6 1/8" x 3 1/4".  For the layers I used the Mini Slimline  envelope and Nested Card Creators dies from Spellbinders. I cut the largest layer from green glitter paper.  I also cut the patterned paper layer from the same Die set. I attached both layers together and used the Twist Frame Die to create the opening.  I lined the opening up on my card front and also cut an opening into my card.  The opening is edged with a green glitter pen from Marvy.  I also added a layer of patterned paper to the inside of the card.  I attached the greeting with foam tape and inserted the twist Santa into the opening. 
Copic Colors Used:
Skin - E11, E000, R81
Black - C7, C5, C3
Gray - C5, C3, C1
Green - YG67, YG63, YG61
Red - R37, R27, R05
Yellow - YR21


Thanks for stopping by and Have a Great Day!

Tuesday, February 2, 2021

Heart Twist Card by Jil Lebel


Hello Ai fans!

I used the Heart Twist stamp and die set with the Twist Frame Die for this Valentines day card.  I love how the twist feature makes it so you can see the back and front of this cute little mouse. Remember that the Twist Frame Die is sold separate. 
 started by stamping the images onto Spectrum Noir Ultra Smooth card stock with Gina K Black Amalgam ink and colored them with Copic markers.  The colors I used will be listed at the end of this post.  I then cut the images out with the matching dies that come in the set. 
I added a piece of patterned paper from the Martha Stewart Woodland Friends Mat Stack to the front of an A2 card.  I die cut the Twist Frame Die into the bottom right corner of the card front.  I cut a strip of red foil paper with a border die from Crafters Companion and attached it along the left border of the card.  I stamped the greeting with Versafine Claire Nocturne ink onto a heart that was cut from the Coffee Gift Card Holder.  
Copic Colors Used:
Mouse _ W0, W1, W3, RV10, RV01
Heart - RV10, R61, R63, R65
Thanks for stopping by and Have a Great Day!

Thursday, July 23, 2020

Cake Birthday Card Set by Crystal


Hey Ai fans! Well I'm back again this week to share a card set using the Birthday Cake stamp set. I love this birthday card stamp set there is so many cute cakes in this set. I might have gotten a little carried away making cards with this set this week I made three different cards and one is a shaker card. 


My first card was really simple I love making striped paper backgrounds with scrap paper I find it relaxing. This card I die cut a corner rounded double stitched rectangle and matted it onto hot pink card stock. 


I adhered the large cake to a small double stitched rectangle die cut out of pink card stock. I also added a smaller cake to the side of the card. I did not add a sentiment I felt with the pattern paper it was not needed. 


The second card was made using stripped paper but I die cut a circle opening to adhere the birthday cake onto pink card stock.


I added  a banner at the bottom of the card and die cut the sentiment "Happy Birthday" from the Twist Frame die set to place over the banner.  


For my last card I have to share today is a shaker card! I love shaker cards they are so much fun! I die cut a double stitched square and the opening out with a circle double stitched die. I use acetate for the window. I get depth for the sequins I use a double layer of foam tape. 


I used the same die cut sentiment as the previous card and adhered it over the top of the circle window. Since this is a shaker card it already has a lot going on so I added a small cake slice from the stamp set to the side. 


Happy Stamping!


Tuesday, May 5, 2020

Feline Groovy Twist Card by Jil Lebel

Hello Ai fans!

I used the Cat Twist stamp Set along with the Twist Frame Set make my card.  I am hooked on the Twists!  They are so fun to move back and forth and have great punny greeting.
I started by stamping the images onto Arches 140 lb. cold pressed watercolor paper with Versafine Clair Nocturne ink and colored it with Daniel Smith watercolors. Then I cut both images with the matching dies and glued them together. I colored the cats body with Goethine ( Brown Ochre) and Burnt Umber.  I used Jane's Grey for the tummy and Lamp Black for the paws. The ears are colored with Permanent Alizarin Crimson.
I cut a layer of Doodlebug Kitten Smitten 6" x 6" paper onto a white A2 card base with Stick It adhesive. Then I used the Twist Frame Set to cut an opening in my card.  I then wanted to add a decorative frame with blue glitter paper.  I used the Twist Frame Set to cut out the center of the glitter but left it in place.  I traced around the outside of the frame with a pencil and cut it out before I attached it to my card. I stamped the Feline Groovy greeting with Versafine Clair Nocturne Ink  and attached the cat image in my card.


Thanks for stopping by and Have a Great Day!


Friday, April 17, 2020

Birthday Cake Twister | By Jessica Shier


Hello Ai fans!

It's Jessica! Today I have a card using the fun Cake Twister. These are so easy to make. This cake has lovely flowers on it, so I thought using some spring colors would be nice. Lately, I've had cooking shows on in the background, especially baking ones! I really had no idea that there are fresh edible flowers that you can use on an actual cake. Must be why I was drawn to create with this Cake Twister!


I used the cake stamp and die set and colored the image with Copic markers. For the window I used the coordinating Twist Frame die, die-cutting the frame onto an A2 side fold Neenah Solar White 110lb card base. This is off-centered slightly.
Quick tip! I like to lay a piece of copy paper underneath the card stock that I am die cutting so that the lines from my cutting plate don't make an impression on the inside of the card base. I have some truly warped cutting plates, so they do leave behind some crazy texture. 


To add some color to the card base I used a stencil and Antique Linen Distress Oxide ink. Then attached the little die-cut stars, which is an accessory die from the Twist Frame die set. I also used the coordinating birthday sentiment to go along with the cake, die-cutting that with a small Art Impressions Oval Double Stitch die.


Thanks so much for stopping by today. Happy stamping!


Tuesday, April 7, 2020

Easter Twist Card by Jil Lebel

Hello Ai fans!

I used the Easter Twist Set to make two different Easter cards.  I enjoyed adding in my Watercolor stamps to make one of the eggs patterned.  They were both fun to make, but even more fun to play with once they're finished.

I started by stamping the images onto Strathmore Cold Pressed paper with Antique Linen Distress Ink and colored them with  Tombow Dual Brush markers .  The colors used are listed at the end of this post. I added in the full strength marker where I wanted it darker and used a damp brush to spread the color into the lighter areas.  I also used some marker scribbled onto my Watercolor Palette to add color.  I drew the faces on with a extra fine black Sharpie pen.
To make the floral egg I masked off the bottom of the bunny and the edges of the egg with a Molotow masking pen. Once it was dry I stamped the heart flowers from the WC Mini Flower Set in small clusters with the Tombow 636 Imperial Purple markers and used my damp brush to soften the color.  I then added the tiny leaves from the WC Foliage Set 2 with the 228 Gray Green marker and softened the color with my damp brush. Once everything was dry, I used a white eraser to remove the masking fluid.  I then colored the bunny the same was that I did for the other card. 
I stamped the Happy Easter greeting onto a piece of white card stock with the Bright Blue Tombow marker. I used the Twist Frame Die to cut an opening into the card base that was covered with paper from the BoBunny Early Bird 6" x 6" paper pad. 

Tombow Dual Brush Markers Used:
Bunny - 403 Bright Blue
Tail - 817 Mauve
Egg - 723 Pink
Thanks for stopping by and Have a Great Day!

Saturday, February 29, 2020

Hello Tweety Bird Twister Set by Sharon Caudle

Hello AI Fans!!

I have another card today showing you the Bird Twister Set that I colored up in greens and yellows this time! I love this bird! He's so much fun!! Have you tried the new Twisters yet??!!  I am obsessed with them!


Thanks so much for stopping by for a visit today and until next time - stay crafty!!


Copics used:
YG23, YG24,
Y15, Y17, Y26
E53
BG13, BG16, BG18
B000
C3, C5


Saturday, February 22, 2020

Bird Twister Set by Sharon Caudle

Hello AI Fans!!

So have you seen the new AI Twisters yet? They are so much fun! Today my card features the awesome #5217 Bird Twister Set! I had so much fun coloring him up!! He's stamped onto Cryogen White paper and then colored with Copic markers. Don't forget you also need the Twist Frame Die if you haven't purchased it yet!  


Thanks so much for stopping by for a visit today, and until next time - stay crafty!!


Copics used: 
R22, R24, R27
Y15, Y17
B14, B16
YG23, YG25
E97