Showing posts with label Tombow Dual Brush Pens. Show all posts

Saturday, July 26, 2025

Let Them Eat Cake (and 🧁s) In The Coffee Shop! by Janet

Sometimes, it's fun to switch things up! That's exactly what I did with this adorable Coffee House Matchbook card, opting for a bit of watercolor magic. While these matchbook cards look fantastic colored with markers, pencils, or even Crayola crayons (I've tried it!), watercolors offer a unique charm. The small images are perfect for adding just a touch of color and shading to achieve stunning results, no matter what color medium you choose.

For this card, I used the 5403-MB Coffee Shop matchbook set, which is packed with all the delicious coffee and baked good images you'd expect from a cozy coffee shop. In fact, I created this card specifically for the "Let Them Eat Cake" challenge. The scene subtly features cupcakes and a large cake, perfectly meeting the challenge's theme. To emphasize the cake theme, I added a sweet sentiment from the 5866-Mini Birthday Sentiments stamp set.

I used Tombow markers from the Ai store for this project, blending the ink on an Ai Watercolor Palette with water before applying each color. While watercolors often yield soft, pastel shades, I wanted to show that you can absolutely achieve vibrant, bright colors with them—and you know I love bright colors in my cardmaking!

To create the base for your matchbook cards, you'll need the 5317-MB Template Dies. This is a one-time purchase that perfectly cuts the base card, making all future matchbook sets incredibly affordable. And to complete the package, I crafted a perfectly sized envelope using the 5318-MB Envelope Dies. This die ensures all your matchbook cards have a custom-fit envelope to match!

Thanks so much for stopping by today! Don't forget to find your favorite stamps, dies, papers and accessories at the Ai Store! You'll always find something that calls to you.

Happy crafting!

Janet YouTube - Blog - Facebook - Instagram - Pinterest 


Sunday, October 1, 2023

Boo Y'all & a Shaker! - by Karen Day

Hello Ai Watercolour fans!


We're changing up how the Watercolour Weekend posts are going to be going forward.  Each of the Watercolour Team Designers will take turns featuring two projects every Sunday, and I'm kicking it off for October with all kinds of photos, info, and even a video!  Lots to see, so keep scrolling.

First, I have a fun Halloween card, using a mix of old & new products:

I stamped the house from 5602 - Spooky House & Post Set and 5778 - FB Frog Costume onto Canson XL Watercolour Paper using Tombow #969/565.  I used one of the Ai Nested Circle dies to draw in the moon behind the house, and then started painting!  For the house, I've used #676 & 606, with 346 for the shutters, and N55 for the grey bits, adding several layers where it needed to be darker.  Using the marker directly on the paper, I added the glowing window panes with #991.  I also used #991 for the moon, washing it out towards the center, and adding an extra layer of colour around the rim to make it darker.
The grass and frog costume were painted in #126, with #158 added to make some areas darker, and #346 was used for his shoes.  #850 became his skintone, with rosy cheeks added with Copic marker.  The frog comes with coordinating dies, so I was able to quickly cut him out.  *Since he is a Front & Back stamp, I had painted up the back image as well, and intended to have the grassy bank on a hinge that would open up to reveal the sentiment, but I ended up just using the front.  The pumpkin was started with #933, and layers of 905 and 969 were added to the underside to create deeper tones.  I used a Black Twintone marker to darken the pumpkin face, and all the details on the frog costume as well.  A wash of #526 was painted in as the sky, with darker layers of colour farther away from the moon.

To assemble my card, I used the purple starry sky paper from the new 5849 - Halloween S2 Paper Pack as the base.  I die cut my scene with a 5063 Rectangle A2 Double Stitched Die, then I created another grassy bank that I die cut and adhered to the base with 3D Foam Adhesive to have it stand out.  I cut out the 3 bats from the new 5769 - Halloween FB Fence Set and two pieces from the 4967 - WC Fence Dies in black cardstock.  The fence was glued onto the grassy bank, and the bats were adhered to the sky, some with 3D foam.  My Trick-or-Treater was glued onto the foreground, with some foam adhesive under his head.  The sentiment is from 5603 - Halloween Sentiments Set, stamped in Versafine Onyx Black ink.

Snowglobe Shaker Card

My second card is using several of the just-released holiday products!  Be sure to scroll all the way to the bottom of my post to see a video of the shaker in action:

I like to use Ranger Watercolour Cardstock when I'm painting snow, as it's a lovely bright white colour, so I cut it into a 4" x 3" piece, and stamped out my scene.  Using Tombows #969/565 for all my images, I started with the deer from the 5791 - WC Snowglobe Set, and then covered him with a mask.  I stamped the 5378 - WC Stone Creek Scene, leaving a space for the church, and eliminating the row of rocks that are farther back (I thought they would compete with the deer image).  This was the perfect background for my scene!  Masking the church, I coloured the smaller pine tree in the set in #249, and stamped it just behind, and then repeated them behind one of the hillsides, to look like the trees were farther away.  I also used the small leafless tree to put a few around the church as well.

Now I began to pull out the colour with a damp brush, being strategic of which direction I pulled it, making sure it was where the shadows would fall, or to simply highlight a hillside.  I went over these areas with a mixture of #565/605 - as I wanted my snow to have a more bluish hue, and I painted in areas where there would be shadows.

For the deer, I used #947 & 969, keeping it lighter on top, and adding more layers of colour to the shadowy underside.  I added a little #N55 to his hooves and antlers, and also painted this onto the door and spire of the church.  To give the rocks a little colour, I dabbed on touches of N55, 947 and 565, as I like them to have a mottled, multi-coloured look.

I softened the pine trees by going over them with a damp brush, and once dry - added touches of Dr. P.H. Martin's white paint to put some snow on the branches, and did the same to the other trees.  It's hard to see, but I added Stickles to the rocks, trees and roof of the church for a little sparkle.  I used tones of #443/565 for both the stream and the sky, keeping the edges a little bit darker.  I adhered my scene onto my card base, matted with some glitter paper.  

To create the shaker, I cut the new 5782 Snowflake Frame Die in white cardstock, as well as some white fun foam.  I glued the fun foam over my scene, then added glitter and sequins in the middle.  I added a rectangle of clear acetate over this, then glued on my cardstock frame - and my shaker was complete!  Here's a slo-mo video so that you can see the shaker in action:


Thanks for joining me today!  Don't forget to look for the Watercolour Design Team with two projects every Sunday here on the blog and other Social Media sites.  See you next month!


For the Boo Y'all card:

For the Snowglobe Shaker card:

Sunday, April 30, 2023

Butterfly Thank You card by ReneƩ Matarese

 Hello Ai fans and happy Sunday!

I needed a thank you card for a friend that gave me a handmade piece of art she found at a craft show. She said it reminded her of me and when she prayed for me when I was sick.

She's a very spiritual person so I know she'll love this set. 
I used 5200 – Butterfly Set.


On the inside I used 5590 – Journal Butterfly Clasp.


Since the butterfly is split in half, I used some little gems to cover the seem.


I used two different patterns of paper from 5742 – Easter Journal Paper Pack.

The matte was made using 5063 – Rectangle A2 Double Stitched Dies and the sentiment was stamped and then cut out with 5727 – Nested Oval Dies.


I only glued down the butterfly's body on each one.
Then, I bent and popped up the wings to give the card some dimension.


Saturday, April 1, 2023

Watercolor Weekend 4-1-23

 Welcome to the first Watercolor Weekend for April!

Our Design Team has all kinds of wonderful Spring inspiration to share with you this week!  First up is Tricia, with her amazing scene:

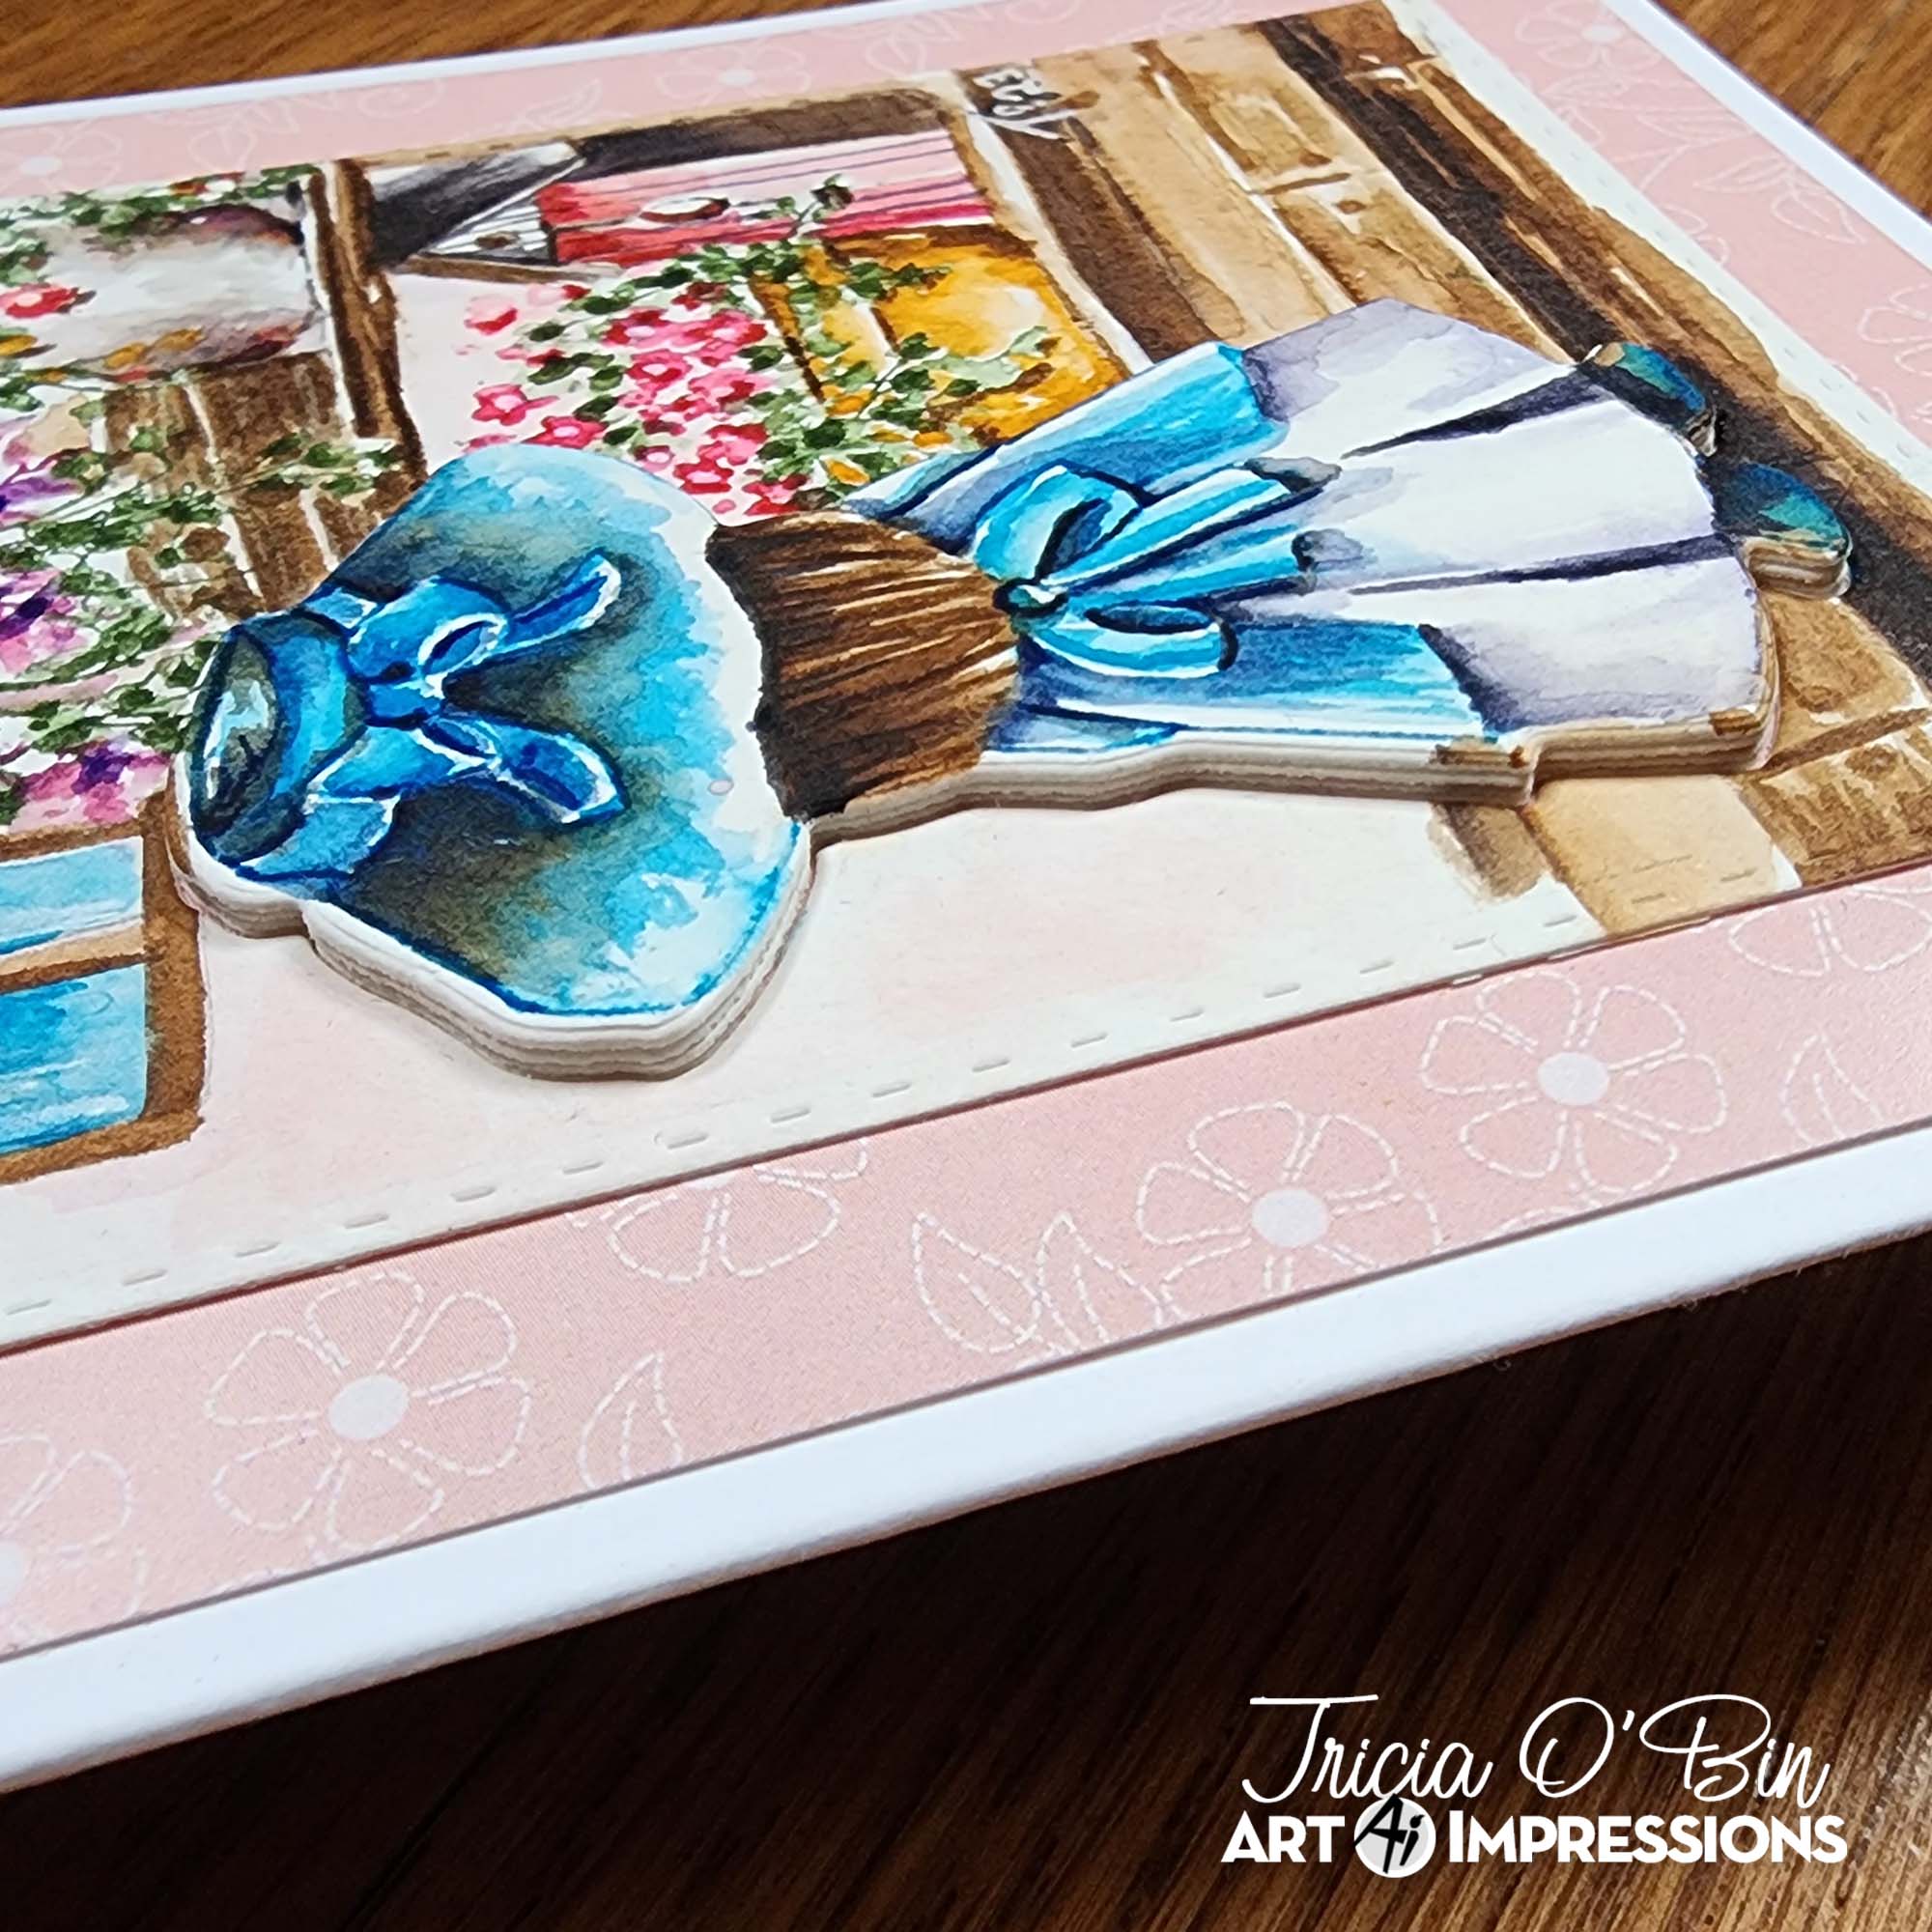
Welcome to the first Spring Watercolor Weekend!  I am ready and I bet all my friends in New England are saying the same thing.  So in celebration of Spring, I decided to use my Foundations Potting Table along with the Little Girl front and back to create this cute little Spring Girl card.  
 

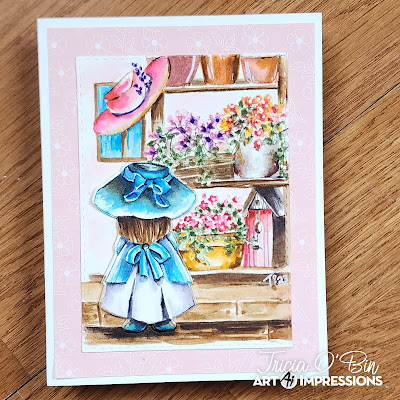
I started out by inking up the back of the girl stamp with 569.  I stamped it off twice to get a really light image.  As with all of our first steps, I pulled the color out of the lines making sure to keep everything really light.  If your brush has too much color, rinse it off and keep going.  Once that was dry, not long at all, I added some 565 to my palette and added it to her dress.  I kept the skirt part white and tried to layer darker paint into those really shadowed areas. For her hair, I added some 969 to my palette and painted in darker and lighter strokes until I achieved the look I was going for. Once she was complete, I created a mask and masked her off.  I didn’t know I was going to pop her up until later. Stay tuned!
 
Once she was masked off, I took my Table stamp and inked it with 969.  I did not stamp it off.  Since it is a clear stamp, I positioned it to the upper right of her and stamped it where I wanted it.  I tried to keep in mind where I wanted the flowers and foliage so I pulled the color out of the structure, pots and hat keeping it really light.  I inked up the long vines and added them to the middle and bottom pots.  I didn’t do the top because I knew it would be chopped off by the die.  Using the daisy bunch and some other stamp that I couldn’t figure out which set it belonged to I stamped in various flowers.  Stamping the flowers in a light yellow and then a pink will give you a peachy color when you add the water.  I added additional colors to the pots and then added water to all the structure, flowers and foliage. I use my fine tip part of the marker to add darker color directly to some of the flowers to give them more depth.  Also, adding a white center with a gel pen creates additional interest.
 
I layered color onto the hat with pink, it’s light so lots of layers to achieve a dark value.  I used the small lilac and my stamp positioner to get it just right onto the hat. For the background, I added the 800 lightest pink color to give a stucco kinda look.  I also added a window and hard wood floor to make it seem like a shed. Once it was done I felt like it was missing something so I took out the Little Girl back die to pop her up. It was perfect, no white space, right up to the line!!! So I cut 3 more out of plain white watercolor paper and glued them behind her.  I added glue to the back and popped it back into the hole that was left and she is exactly where she was but higher šŸ˜Š  Lastly I signed and dated.


Get out there and enjoy the Spring and paint something beautiful today!  Thanks for joining us and see you next time!
And now for a sweet scene from Karen:

Hello Ai Watercolour fans!

I made a spring scene featuring one of the sets from Bonnie's fall release (they work for any season!):

I stamped the wheelbarrow from 5597 - Harvest Wheelbarrow Set in Tombow #969/565 onto my Canson XL Watercolour Paper, then masked the edge to stamp my puppy from 4959 - WC Dogs Set, and my three pots from 4869 - WC Small Container set, masking and stacking them as I went.  I softened all the lines with a damp brush, and then created my florals.  For the striped pot, I began with the trailing vines from 5126 - WC Foliage Set 4 in #158, and added the daisy bunch from 4050 - Flower Set in #991.  The taller flowers are from 5475 - WC Flower Set 6 stamped in #177/533, and then I used the tulips from the same set to fill the other pot - creating a two-tone effect with #991/856 on each bloom, and 158 on the leaves.

I used #947 to create the terracotta pot, and painted layers of #969 on the puppy, keeping some areas white, and building up layers of colour where I wanted him darker (he reminds me of Sharon Caudle's new puppy!).  For the wheelbarrow, I painted layers of #526 for the blue, and used layers of #N65 to be the metal parts, keeping some areas white where they would be shiny.  I used the grass from Foliage Set - 4051 in #177, and then used #565 to paint in the sky, the stripes on the pot, and shadows where needed.  5061 - Square Double Stitched Dies was used to cut out my scene, then I matted and adhered it to my base with 3D foam adhesive.


And here's a little "Easter Action" (pun intended!) from Diane:

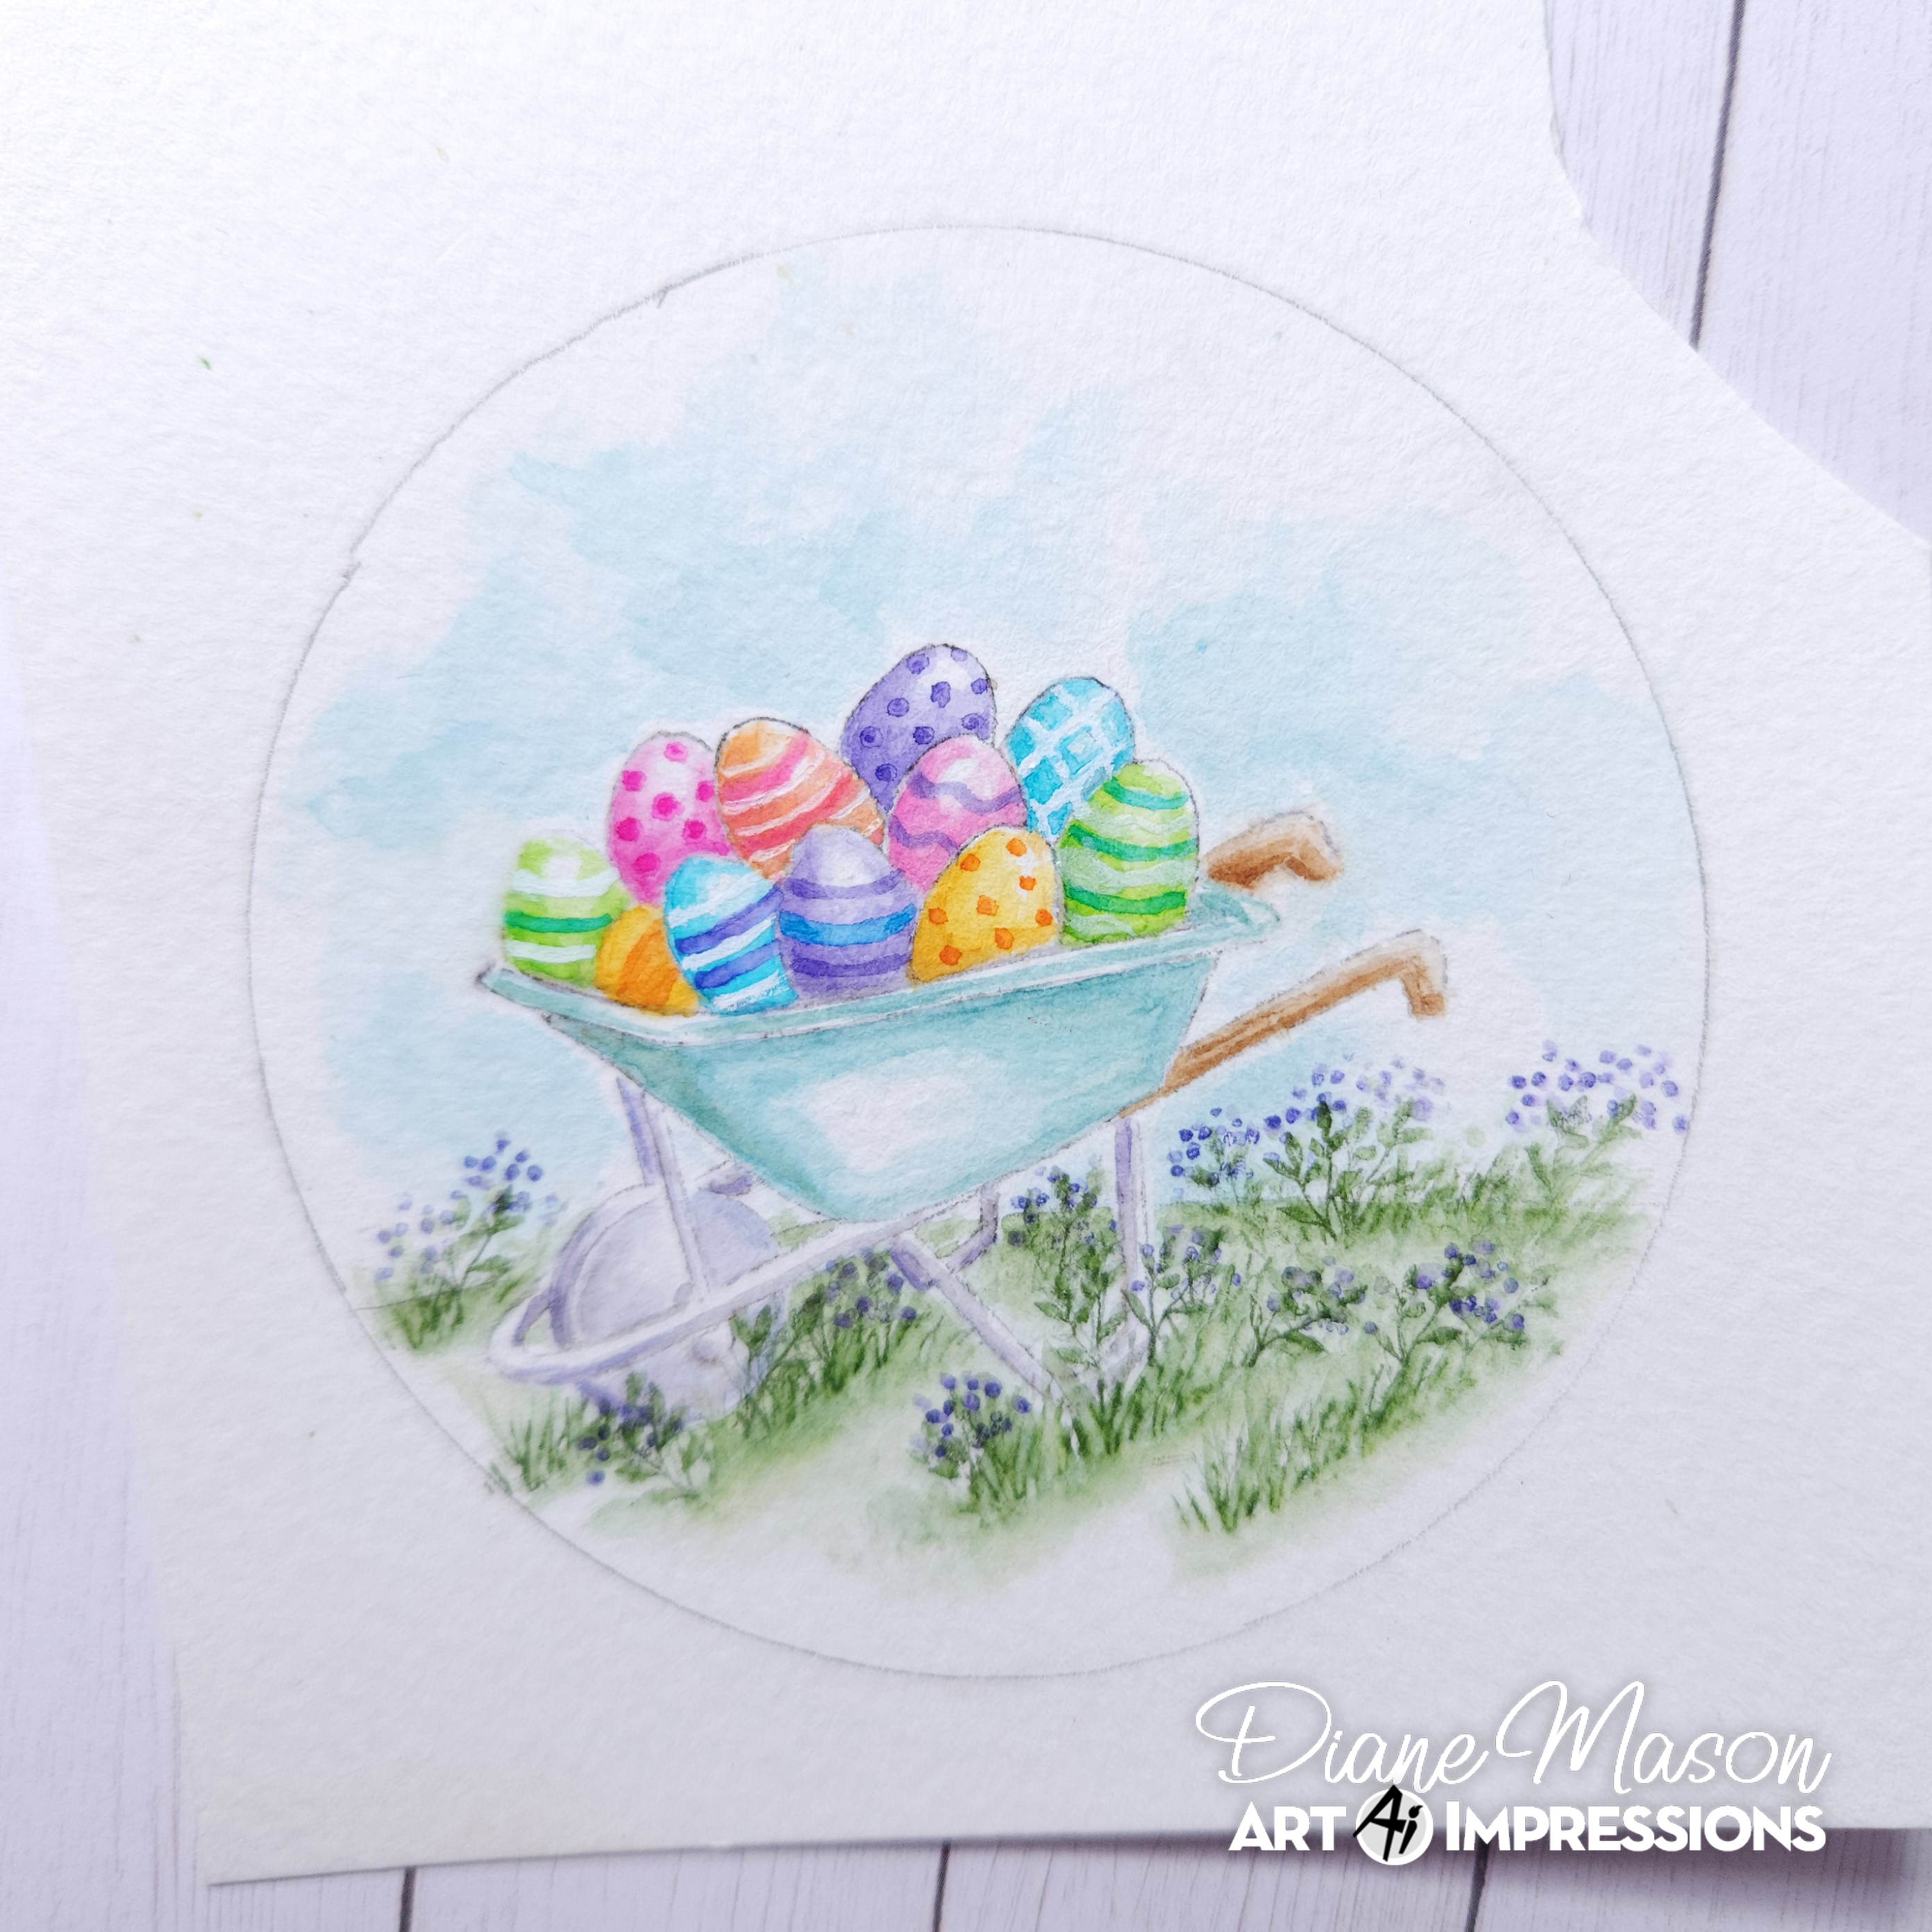
Welcome to another Watercolor Weekend! Easter is coming upon us quickly, so I decided to make one
last Easter card. This card uses several of the newer sets, including the bunny from the front and back
set. This little bunny got quite a haul at the Easter Egg Hunt – his wheelbarrow is almost overflowing! To add some interactive fun, the bunny is attached to a Mini Action Wobbler.
This card does require a little masking but nothing too difficult.
All stamps are inked with 969/565 and stamped off once before stamping onto Canson XL Watercolor
Paper. I started off by stamping the wheelbarrow from 5597 – Harvest Wheelbarrow Set. I masked off
the edge of the wheelbarrow and stamped the group of eggs from 5738 – Easter Egg House Set. I then
created a mask of the eggs and stamped in a few more eggs to fill the wheelbarrow. After removing the
mask, I pulled out the color with a damp brush to add shadows to the eggs and wheelbarrow.
I used 526+177 to paint the main part of the wheelbarrow, leaving some areas lighter, and darkened
some areas by layering to add contours. I used 969 for the wooden handles. For the metal parts of the
wheelbarrow and the wheel, I used a mix of 565+969 to add shadows and contours. For areas that
needed to be further darkened, I used 565. I used 173/725/933/025/993/493/606 for the Easter eggs. I
made sure to leave highlighted areas on the eggs so they look rounded. Next I randomly decorated each
egg with dots and stripes. I stamped the front bunny from 5732 – Bunny Front and Back Set on a
separate piece of watercolor paper. The bunny’s fur is painted with 969. I used a tiny amount of watered
down 725 for the cheeks, tongue, and inside of the left ear. I painted the egg he is holding with 725. I
left the jacket white and added shadows and contours with 565. For the pants and the stripes on the
shirt, I used 526. I darkened the eyes and mouth of the bunny with a brown TwinTone marker and used
a gray TwinTone marker for the whiskers. Then I die cut the bunny with the coordinating die and added
a Mini Action Wobbler to the back of the bunny (I had to trim it a little to fit). I brushed in the sky with
some watered down 526 and brushed in a hill with 177. I added the tiny grass stamp from 4051 –
Foliage Set 1 with 177 then pulled out the color from the grass. For the flowers I used the small leafy
vine from 4867 – WC Foliage Set 2 in 177 and the small group of dots from 5009 – WC Mini Flower Set in 606. I added tiny white dots to the flowers with Dr. Ph. Martin’s Bleed Proof white and for the additional details on the eggs.
I chose a bright plaid patterned paper to complement the painting and cut the panel to fit an A2 sized
card. The painting was die cut with 5726 – Nested Circle Dies and matted with pink cardstock. I stamped the sentiment, “Easter’s on its way!” in Rosebud Memento ink onto watercolor paper. Then I die cut the shapes from 5543 – Journal Template Die Set and popped it up with foam squares. For the inside of the card, I adhered a strip of ½” patterned paper to create a border on the bottom edge. To finish off the card, I stamped the “Hoppy Easter” sentiment from 5733 – Easter Sentiment Set in Rosebud Memento ink onto the card base. And finally, I attached the action wobbler bunny to the card. Of course I just had to give him a little flick to see the action – so much fun!

Until next time, Happy Easter and Happy Painting!


And that's a wrap for this week's inspiration from the Watercolor Design Team.  We'll see you in two weeks with more projects to spark your creativity!

Saturday, December 10, 2022

May Hope, Joy, and Love Fill Your Heart by Janet


Hello everyone! I'm taking a quick break from holiday cards for a moment with a watercolor card this weekend. One of the things I love about Ai is that they have many images that address faith. My Pastor turned in her resignation recently and I wanted to make something special that would reflect our connection together in faith as a parting gift. I chose to use the beautiful M3191 Chapel Window To The World stamp. 

To make the card, I folded an 5 1/2" x 11" piece in even thirds. Then I cut a window in the top layer only with a 5061 Square Double Stitched die. This created a pretty window with stitching around the outside of it. The second fold shows through and provides a place for a stamped image to be attached behind the square window. I used a border die from the Journal Template Die Set to cut two borders for the top and bottom of the card. I applied these with Art Glitter Glue. I used a strip of fancy jewel and pearl bling at the top for an additional border.

Next, I stamped and water colored the chapel image on watercolor paper and painted it using Tombow Dual Brush markers and a #1 & #4 paint brush. After completion, I secured it behind the window with adhesive and wrote a personal message inside. You might wonder why I would use red on the church door. In the Lutheran faith, the entry door is traditionally red. Being able to add that little touch for my Pastor is a good example of how card makers can personalize their work for a meaning that would be hard to achieve commercially.  

My card conveyed the perfect message and I'm thankful for this design from Ai. Check out all the Windows to the World stamp sets to find the perfect message you want to convey.

  Thanks for stopping by today for a little creative fun. Be sure to visit the Ai Store for lots of additional inspiration and don't forget to get this fabulous stamp set before it's too late!

Wishing you a very crafty day!

Janet Facebook Instagram - YouTube - Pinterest 

Saturday, June 25, 2022

Get Well Matchbook Card by Janet Axtman


Hello Ai fans! Today I am excited to show off my first Matchbook card using one the newest releases in the line. This is the #5499 MB Get Well set. It's so super cute as a get well card and it comes with 4 possible sentiments that can be used which is an expansion from previous sets. It's great having even more options.

I made this by stamping on watercolor paper and using my Tombow Dual Tip Brush Markers to watercolor the images before cutting and placing them in the matchbook card base which I cut with #5317 MB Template Die. Remember that you only need to buy this die once because it works with all the matchbox sets. I also added the clock from the #5323 - MB Wall Accessories Set. I made the perfect envelope for this little masterpiece using the optional #5318 - MB Envelope Dies. Not only does it create the envelope but there are a few additional dies that can be used to decorate the envelope. I cut a tiny little bow to put on the envelope flap.

Tombow Markers Used:
Purples: 620, 553, 636
Grays & Black: N89, N95, N60, N25
Misc. Colors: 761, 062, 992

Thanks so much for stopping by today. The whole Matchbook Line is so fun and unique. I hope you'll visit the store and check out the large selection of rooms and themes.

Wishing you a very crafty weekend!

Janet YouTube - Blog - Facebook - Instagram - Pinterest  

Friday, October 9, 2020

Fall daisies to a dear friend | By Jessica Shier

 Hello Ai Fans!

It's Jessica on the blog today. I have a watercolor floral card to share. I'm using the Daisies Exclusive set from Art Impressions sold only at Scrapbookcom. To watercolor I'll be using Tombow Markers. This lovely image is bordered by a cork paper and gold embossing powder. 

I started with stamping the large daisies on watercolor paper using Versafine Clair Nocturne ink. I love this ink for water coloring and also for stamping detailed sentiments. The colors of markers I used are listed below. I used two tones of each color of markers. First using a light wash of color, using the lightest marker then adding in more depth with the darker marker, once the first color had dried. I also went straight in with the tip of the marker to achieve a darker color in the smaller shadow areas. Once the coloring was done I also did a light wash of watercolor with the Process Blue 452 marker around the flowers. 


The flowers are such beautiful colors that I decided to use more neutral shades for the rest of the card. I trimmed down the watercolor paper a bit and added a bright green cardstock underneath. I've had this cork paper around for a long time and it normally makes an appearance around fall and winter. Though it is discontinued you can still find cork paper in places. I used this lovely pattern and adhered it to a A2 Neenah Desert Storm cardbase. 

Before attaching the flowers to the base I used some gold embossing power on the edges of the card base. Such an easy way to add some quick texture. You do this by taking your embossing ink, I like Versamark, and swiping the edge of the ink along the edge. Then pour your embossing powder over the inked areas and heat to melt as normal.  


For the sentiment I used vellum and the same gold embossing powder. The smallest Rectangle Double Stitch die perfectly die cuts out this lovely sentiment. To adhere the vellum down I used a fine tip applicator and Multi Medium Matte glue. Placing the glue in the areas directly behind the letters, so that the glue doesn't show through the vellum.

Tombow Markers used:

Pink - 743, 755
Purple - 679, 636
Orange - 933, 947
Green - 028,  098
Blue - 452

Alright that is it from me today! Thank you for joining me. Happy Stamping.