Showing posts with label WC Sentiments Set 2. Show all posts

Saturday, May 18, 2019

Watercolor Weekend Roundup - Sweet Sentiments

Hello, Ai Watercolor Fans! It's a beautiful Saturday morning, and time to share beautiful projects from our design team to inspire your creations this weekend! Let's take a look!

Dot Freel - Instagram - Blog - Pinterest
Hello Friends,

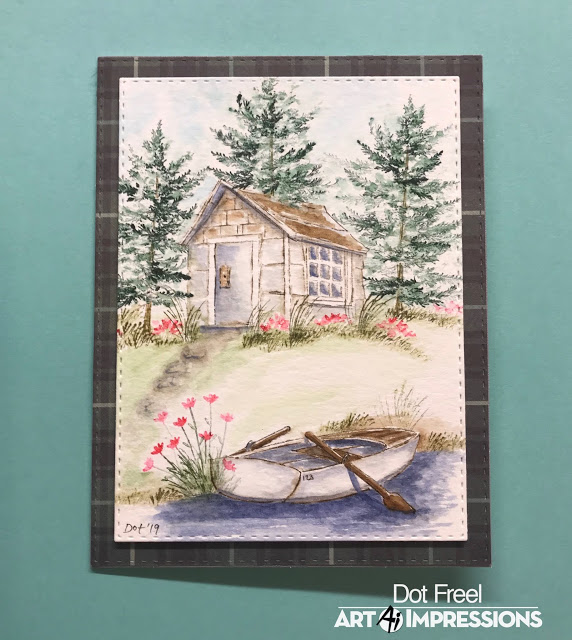
Here's the card I made for the Art Impression's Watercolor Weekend. It could be my granddaughters on their trip to Hawaii in March. I stamped the shed from the 5121 - WC Garden Shed Set using both 86 African violet and brown 969 after I stamped it off on a scratch piece of paper first. I used the brown to color in the roof and door knob area. I used 17 steel blue to watercolor the shed and the windows. I stamped in the palm trees from the 5120 - WC Palm Tree Set with the brown and green 177. I used the smallest palm frond to stamp the ground cover and then used the flowers from the 4052 - WC Flowers Set 1 in the pink 725 for the flowers. I used 101 tropical with a touch of green mixed in to color in the water using straight strokes and brown to watercolor the sand. I stamped the little girls from the 5118 - WC Beach Girls Set using the 40 brownish grey then colored them with yellow 993, 77 pastel peach, steel blue, pink 725 and brown 969. I stamped one flower at a time with the pink for the swimsuit and then added a yellow dot in the centers. I used the fine tip of the 45 sepia to add hair strands to both girls. I used 86 African violet to add the shadows under the girls, trees and house. I used very little of the blue and a lot of water to color in the sky. I cut out the picture using the 5063 - Double Stitched Rectangle Dies and adhered it to my card base. The last thing I did was sign and date it.

You can find more inspiration by following me on my Instagram account here.


Karen Day - Blog - Facebook - Pinterest
I've had the idea for the dress card floating around in my head for awhile. I wanted to use the Ai floral & foliage stamps to create a sort of life-like embroidery look, and kept going to create a grouping of wedding themed items. I sketched the outline of my dress in pencil, directly onto my watercolor paper, and indicated where I wanted the higher points around the hemline to be as a stamping guide. Using the Daisy Bunch in Flower Set 4052 and my #703 Pink Rose marker I stamped it three times without reinking, multiple times around the hem, and again on the neckline. I repeated this with the tiny cluster from 5009 WC Mini Flower Set in #676 Royal Purple. For my last flower, I used the Mini Foxglove from Flower Set 4052 and #533 Peacock Blue, stamping it three times in a row to create the flower stalk. With my #126 Light Olive marker, I coloured just the tip of both of the trailing ivy stamps in 4876 WC Foliage Set 2 New to fill in the greenery, making sure to change directions to keep it looking random. I used my damp #4 paintbrush to dab at each of the flowers & foliage to soften each image and enliven the colours. It then became apparent where the holes were on my 'embroidery', so I used the small green from 4876 WC Foliage Set 2 and #158 Dark Olive to fill in those white spaces. I left these as is, not using my paintbrush, as it defined the shape of the foliage a bit more. I traced the pencil outline of the dress with #533, and used this colour with my brush to add some shading. I picked up #565 Deep Blue from my palette and painted a background wash around the dress. I went in with all of the markers directly onto the image to add in a few deeper colours. The sentiment is from WC Sentiment Set 2, stamped in Versafine Onyx Black. I used my sewing machine to stitch the panel to some coordinating cardstock and adhered it to my base with pop dots, then glued on some iridescent sequins. 
The colours and stamps are all the same for my other two projects. For this card, I sketched in the cake and the table, just adding foliage to each layer. I sketched in a heart as my cake topper, and painted in a few ripples on the tablecloth. I stamped this sentiment separately, matting and stitching around it, and adhered it with pop dots going off the right edge. 
As a fun little add on, I painted a bouquet and drew in a ribbon bow underneath it to use as a placecard.


Tricia O'Bin - Blog - Instagram - YouTube - Pinterest - Facebook
Welcome back AI fans to Watercolor Weekend! I wanted to do a simple project for this weekend, so I decided to do this Simple Things Vase. This project is really easy and quick. I have done a video for you to show you just how quick. 

Project Details

Step 1 – Ink up the Vase from the WC Decorative Vase Set with Blue. I wanted my vase to be white so I am using the tombow 569 but you can use any marker you may have. Bonnie Krebs uses 565 a lot in her videos. I stamped it to the left side of my paper to allow room for my sentiment. Next, pull the color out of the lines along the right and left side of the vase. This creates the illusion of the vase being round. I wanted the area under the spout and the right side under the handle to be really dark.

Step 2 – Cover your vase with a mask, I am using a piece of Post-It tape. Stamp in your foliage. I am using the leaves from the Foliage Set 4, but you can use any foliage/vines you may have in your collection. This is the greatest part of Art Impressions watercolor line; all the stamps can be used together for any project. Therefore, you don’t have to feel like you can’t create this project because you don’t have the exact stamps I am using. I inked them up with 158 and stamped them a few times. Add water to the leaves.

Step 3 – Ink the flowers with a color of your choice. I used the Daisy Bunch from the Bible Flowers Set inked with 905. I only inked up the top 3 flowers and stamped them in a circle a few times. Stamping items in groups of three is visually appealing so I stamped one in the middle and one on each side of the vase. Add water to the blooms.

Step 4 – To create a little more interest, I used the vine from the Bible Foliage set to create different leaves around the blooms. I inked it up with 249 and stamped it several times around each of the blooms. Add water to the leaves.

Step 5 – Ink up the dots (they remind me of lilacs – although I keep calling them violets LOL) with a purple. Unlike the daisy bunch, this stamp is walked out to create the lilac. Again, I stamped three different blooms. Add water to the blooms. I added a small amount of 569 from my palette underneath the vase to ground it and create a shadow.

Step 6 – In order to create some additional interest, I added the accent flowers to the vase. This created some height and I just love how they look on any project. I inked them up (I used the left and right stamp) with the 379 and stamped them several times around the vase. No need to add water to these.

Lastly, I signed and dated it. 

Card Details

I stamped the “It’s the Simple Things” to the right side of the panel using a sentiment from the WC Sentiments 2 set and some Gina K Designs amalgam ink. I thought it needed a little something more, so I added a flower to the bottom right side of the sentiment. This was done using the lilac stamp and the vine. 

Easy peasy right? I think so. We hope you will join us this weekend and show us your creations on Instagram using #AIWatercolor. Check out the video here if you want to paint along with me.


Thank you so much for stopping by and I hope you have a creative weekend! See you soon!


Thanks, team! These projects are all so gorgeous! From beachy scenes to hand-drawn elements to customize your creations, to a lovely floral arrangement with video tips! What an awesome day! Be sure to leave a comment below so we can hear what you enjoyed about this week's installment. We'll see you again soon!

Happy Stamping!


Saturday, May 4, 2019

Watercolor Weekend Roundup - Homey Inspiration!

Hello, Ai Watercolor Fans! We have three more fabulous projects for you from our Watercolor Guest Design Team! We hope you enjoy these outdoorsy house scenes from Dot and Karen, as well as a colorful floral wreath by Tricia! Let's take a look!

 Dot Freel - Instagram - Blog - Pinterest
Hello Friends,

I was inspired by my camping/fishing weekend in Utah to make a card for my son's birthday. I stamped the boat from the 5057 - WC Boat Set in both 86 African violet and brown 969 and then I pulled the color out of the lines. Next I stamped the shed from the 5121 - WC Garden Shed Set again first using African violet and then the brown. After pulling the color out of the lines, I used the brown to color in the roof, shingles and door knob area. I used African violet to color the windows, add shade under the roof, on the door, and the water around the boat. I used the brown to watercolor the oars, the bench and the top of the boat. I used the brown to watercolor the ground on the other side of the boat and the walkway from the shed. I stamped the tree trunks from the 4960 - WC Fir Trees Set in brown, then I stamped in the branches using green 249. I added 75 sky blue to the palette to color in the sky. I stamped the grass from the 4051 - WC Foliage Set 1 in with 27 olive brown. I stamped the tall grasses from the 5007 - WC Foliage Set 3 also in the olive brown. I stamped the flowers by the boat from the 4868 - WC Flower Set 2 using green 177 and orange 885 for the flowers. I stamped in the heart flowers by the cabin from the 4868 - WC Flower Set 2 in the same orange color. I cut out the picture and a background piece using the 5063 - Double Stitched Rectangle Dies. I used my Copic pen to sign and date it.

The birthday card below is the first card I made which I will give to my second son Chad and then I made the other version for the Art Impression's Watercolor Weekend blog post. Give it a try!

Karen Day - Blog - Facebook - Pinterest
To create my scene today, I've paired up one of the cottages from 4958 - WC Cottages Set (this is SO typical of historic homes in my area!), with the footbridge from the just released 5122 - WC Bridge Set, inking them both with Tombow #969 Chocolate. Using the smaller tree from 5010 WC Tree Set 1, I stamped it several times on each side of the cottage with my #969, then softened all the lines with a damp #4 paintbrush, pulling out the colour on the tree trunks, and on the footbridge. I coloured my #177 Dark Jade marker onto the tiny foliage sprig in the 5009 WC Mini Flower Set, stamping it repeatedly to get 2nd & 3rd generation foliage in the trees, and creating shrubs around the house. Also from the Mini Flower Set - I used my #533 Peacock Blue to colour the tiny floral cluster (it looks like dots!) stamping it around the shrubs to suggest purpley/blue flowers. Dabbing at them with my damp brush softened the images, and intensified the colours. I initially drew the tufts of grass directly with my #076 Green Ochre marker, but since it is quite a yellow/green, my scene had a bit of a fall feel to it, and I was aiming for spring! So I picked up the #177 green off of my palette, and painted a wash of green grass, darkening up the grasses directly with the marker as well. I painted the pathway with #992 Sand, and added #491 Glacier Blue onto the roof & door. I painted a touch of #856 Chinese Red onto the chimney, then went in with the fine point of it to sketch in the bricks. I picked up #565 Deep Blue with my brush to paint in the stream, and then added the shadows to the windows, pathway, around the house & trees, and finally painted in the sky. With my scene complete, I always walk away for a few hours (days?) and come back with a fresh eye. I did want to darken things up a little, so I went back in with both my 177 and 565 markers, adding grasses and flowers in the deeper tones.


Tricia O'Bin - Blog - Instagram - YouTube - Pinterest - Facebook
Hey there! Welcome to another Art Impressions Watercolor Weekend! Today I am sharing my "Enjoy The Day" spring wreath. 

Step 1: Start off by lightly tracing around a circle die. This can be any size you like based on how big you want your wreath to be. Make sure you leave space around the circle for your leaves and flowers.

Step 2 : I chose a larger branch from the 4964 - WC Branches Set and inked it up with 969-Chocolate. I stamped it along the circle, trying to keep the largest part of the branch on the traced circle. I stamped it a couple of times, then re-inked it. You don't need to add any water to the branches, they are more of an accent stamp.

Step 3: I inked up the leaves from the 4605 - Spring Basket with 177-Dark Jade. You can use either one. I inked it up and stamped it several times on each branch. I added water to each of the leaves. The water may cause the color from the leaves to mix with the brown from the Branches but this is OK, unless you don't like that. I actually think it creates more interest and depth.

Step 4: I inked up the flower from the 4604 - Chest of Flowers with 443-Turquoise and stamped it around the wreath. I added water to each bloom. Next, I inked up the small dots flower from the 5009 - WC Mini Flower Set inked with 725 - Rhodamine Red and stamped them alongside the flowers. I added water to the blooms and then stamped them again using 606 - Violet.

Step 5: Using my MISTI, I inked the Enjoy The Day sentiment with the Rhodamine Red and Violet. I re-inked and double stamped it. I carefully added a small amount of water using a #1 paintbrush. Lastly, I signed and dated it.

Check out my blog for more details on how I put the card together. Check out the other design team members inspiration over on the AI Blog. Tag us on Instagram with #AIWatercolor.


Thanks, team! These projects really are beautiful and perfect for giving to a loved one this spring. We are always searching for inspiration for structure scenes, and your projects with stepping stones, bridges, trees, and water is just so pretty! Also, the floral wreath has some really lovely flower stamps tucked in some of our favorite mini sets!

We'd love to hear what you think about these projects, drop us a comment below! Did these cards give you ideas for your projects this weekend?

Happy Stamping!

Tuesday, April 30, 2019

Good Shepherd Watercolor Cards by Jil Lebel

Hello Ai fans!

For today's card I wanted to use the Good Shepherd Set from the Bible Journal line of watercolor stamps.  I used it with the Watercolor Sentiment Set 2 to make two everyday cards.
I used the Ai watercolor method to color my stamped images.  I've listed the Tombow marker colors I used at the end of the post.  I kept the main image the same but changed up everything around it.  I added a barn to one of the watercolor panels and a fence to the other.  I also changed up the flower placement.  I kept all of the colors the same.
Once my panels were complete, I cut the using my Double stitched dies from Ai and added them to the dry embossed background.  I used a seam binding bow and a button to embellish the top of the embossed layer. The sentiment is stamped with Versafine Claire Nocturne ink and cut into a banner. I attached everything to a teal A2 card.
Tombow Dual Brush Colors Used:
177 Dark Jade, 526 True Blue, 565 Deep Blue,
725 Rhodamine Red, 969 Chocolate, 993 Chrome Orange,
N25 Lamp Black


Thanks for stopping by and Have a Great Day!

Saturday, April 6, 2019

Watercolor Weekend Roundup - NEW Inspiration!

Hello, Watercolor Fans! Ready for a dose of Watercolor Inspiration? We are so excited about these beautiful projects from our Watercolor Guest Design Team! We hope you enjoy them as well!

Dot Freel - Instagram - Blog - Pinterest
Hello Friends,

Easter is less than a month away and I need to get busy making Easter cards. I made this card for the Art Impressions Watercolor Weekend using the new 5123 - WC Decorative Jar Set. First I colored the teapot stamp in 696 then in 565 and stamped it off before stamping it on the paper. I then colored it in using 603. I used the stamp positioner to stamp the bunny from 4874 - WC Bunnies Set in the pot using 40 brownish grey, which I also used for the shadow under the teapot. I colored the bunny's ear and cheeks using 67 bubble gum pink and 177. I then stamped the flowers from the 4052 - WC Flower Set 1 in the pink as well. The other flowers are from the 4876 - Wooden Chair Mini Set and they are stamped in the 565 and 177. I added the grass from the 4051 - WC Foliage Set 1 in 177. I used the sign and eggs and bow from the 4976 Holiday Mansion Easter Set, then colored them in using the same colors. I colored the sky using 75 sky blue. I added some glitter using a Wink of Stella glitter pen. I used my Copic pen to sign and date it. I cut it out and framed it using the 5064 - Double Stitched Circular Die Set and a rounded corner punch for the card base.

You can find more inspiration by following me on my Instagram account here.
Karen Day - Blog - Facebook - Pinterest
I've used seven stamp sets in my scene today! I started by placing one of the sheds from 5121 - WC Garden Shed Set and the 4703 Flower Cart together on the same block, which allowed me to control exactly where they were placed to achieve the right perspective. I coloured them both with 969 Chocolate, stamped, and softened the lines with a damp #4 paintbrush. I used a combo of 969 and 992 Sand to paint in the roof, shingles and cart. Using N57 Warm Grey, I coloured and stamped 2 of the stepping stone images from 5018 Cobblestone Set, and pulled out the colour to create some texture and shadows. I used the two trailing greenery images from 5126 Foliage Set 4 coloured with 177 Dark Jade to stamp foliage falling out of the cart, and dabbed them with a damp brush to activate the ink. Next I used the floral cluster from 4052 WC Flower Set 1 coloured in 676 Royal Purple to create the pink flowers in the cart, and after masking the shed, I stamped them on either side of it. I coloured 565 Deep Blue onto the tiny bluebell image from Flower Set 1, stamping it three times in an upward direction to create tall stalks of blue flowers. After softening all the flowers/foliage with a damp brush, I went in with the tiny leaf image from 5009 - WC Mini Flower Set (oops! that's an 8th stamp set!!) to fill in around the flowers where needed. I also used it around the shed to create some bushes with the flowers. I used both the small and large grasses from 4051 - WC Foliage Set 1 in 177 as well as 126 Light Olive to add the suggestion of grass around the shed, stones and cart. I pulled out the colour from the grasses, and painted in and around the images to create a wash of green grass. After masking off the shed, I coloured two of the tree images from 5010 WC Tree Set 1 in 177, varying the heights - then softened them with a damp brush. Finally, I scribbled 565 onto my palette, and painted in the sky and the door, and then used it to add shadows to the window, stones and cart. 

Tricia O'Bin - Blog - Instagram - YouTube - Pinterest - Facebook
Step 1: Ink the small pot from the Build My Life set in 969-Chocolate. Stamp it and pull the color out of the lines. I added 837-Wine Red to my palette and added it to the pot being sure to leave a highlight in the middle.

Step 2: I masked the top of the pot with a piece of post-it tape. I inked up the tall foliage from the New WC Foliage set with 969-Chocolate and 249-Hunter Green and stamped it several times on the left side of the pot. I removed the mask and softened the leaves with water.

Next, I inked the small vine from the New WC Foliage Set with 249-Hunter Green and stamped it several times along the right and into the top of the pot. I softened the lines.

Step 3: I inked up the small dots from the WC Mini Flowers set in 725-Rhodamine Red and stamped it several times in a circle. I added water to the bloom. I didn't really get a good depth so I inked it up with 636-Imperial Purple and again stamped it in a circle on top of the pink. I added water.

Finally I added some Chocolate underneath the pot to ground it. Finally, I signed and dated it.

Card Details
I placed the watercolor piece into my MISTI and lined up the Dear Friends circle over the pot. I inked it up with Gina K Amalgam ink and stamped it twice.

I used the double stitched circle die to cut the watercolor piece. I used a watercolor background to cut a mat using a Spellbinder circle slightly bigger than the watercolor piece. I cut a piece of fun foam to pop it up.

I die cut the background with Altenew Layered Medallians dies cut from Neenah Solar White 80 lb card stock. I added these to a Neenah Solar White 110 lb card base. I glued the watercolor piece to the top of the card.


If you enjoyed these projects, be sure to leave us a comment below! Have an awesome week!

Happy Stamping!

Wednesday, March 27, 2019

NEW VIDEO! Sentiment Wreath Watercolor

Hello Ai Fans!

Time for another blossoming Watercolor Wednesday! You might have found a few wreath videos on our YouTube, but we love this simple and quick (less than 7 minutes!) video using our new WC Sentiment Set 2! Bonnie adds vines from our new Foliage Set 4 and some of our favorite flowers for this beautiful friendship card!

We always appreciate it when you hop over to the video and give it a "thumbs up" if you liked it!

Have a flower-filled Watercolor Wednesday!


View on YouTube: https://youtu.be/z5rwH22MZ6c


Thursday, February 28, 2019

NEW Watercolor Release! FIVE Sets Available Now! Challenge 251 Floral Cards!

Hello, Ai Fans!

Hooray! Welcome to our first Watercolor Releases of 2019! These fabulous sets are sure to be favorites in your collection! Our WC Decorative Jars Set includes four gorgeous containers, such as pitchers and even a teapot! The set also includes three decorative designs for accents. Create a playful scene with our WC Bicycle Set, including four bikes with baskets, ready to be filled with flowers. Enjoy our whimsical WC Elves Set, featuring mushrooms and little characters for scenes with a touch of magic. Add the new WC Foliage Set 4 to your collection, because Bonnie is sure to use the small bunches of wild grass, tiny left- and right-facing vines, and other leaves in her upcoming videos! Last but not least, our WC Sentiments Set 2 features several sweet verses to pair with your projects.

Be sure to subscribe to our YouTube channel so you don't miss our Watercolor Wednesday video tutorials on these fabulous sets! These sets, along with our NEW 2019 Watercolor Catalog, are now available at artimpressions.com!


Decorative JarsWC BicyclesWC ElvesFoliage Set 4WC Sentiments 2
We have a plethora of inspiration from you today, from our Watercolor Guest Design team members, as well as our own Bonnie Krebs! Let's take a look at what these lovely ladies have in store for us today!

Bonnie Krebs - Instagram
Hear what Bonnie has to say about these new sets in her video below!


Dot Freel - Instagram - Blog - Pinterest
Hello Watercolor Friends,

There are some amazing brand new stamp sets available now from Art Impressions! I used the new 5125 - WC Elves Set to create this card for the latest challenge, "Floral Cards." I stamped the mushroom using both the brown and blue. I pulled the color out of the lines. I took Sepia from the palette

to paint in the circles on the mushroom top. I used the red 885 on the palette to color in the mushroom top. I stamped the door from the 5056 WC Fairy Doors Set (which fits perfectly) using the sepia and added lines with the fine tip of the sepia pen. I colored the door pine green, using the palette. I used the sepia fine tip to darken in the door shadows and door knob leaving that white high light in the center. I used the stamp positioner to stamp the elf on top of the mushroom house using 40 brownish grey. Then I colored him using the pine green on his pants and hat and half sleeves and I used 77 pastel peach to color in his face and hands. I colored his hair and shoes in with the sepia. I stamped a single flower in his hand from the 4868 WC Flower Set 2 using blue 565 and pine green and then stamped in the group of those same flowers above the mushroom and added water. I used pine green and stamped the leaves from the 5009 - WC Mini Flower set then used the flowers from 4052 - Flower Set 1 and stamped the flowers in using the red 885. I added water to them. I used the grass from the 4051 - WC Foliage Set 1 and stamped it in using the olive green. I used the tall stalks from the brand new 5126 - WC Foliage Set 4 and the 72 pine green and stamped them in the background. I put some olive green on the palette and dabbed it in around those leaves. I used blue 526 on the palette to color in my sky. I took actual watercolor paint - silver and white to make my sky look more cloudy. I cut out my image using the 5065 - Oval Double Stitched Dies and cut out the red background piece from the next larger oval die. I used two of the 5063 - Rectangle Double Stitched dies for the next background pieces. I glued those little green jewel flowers in the corners. Lastly, I used a Copic Multi Liner 0.03 pen to add the black centers to the flowers, draw in the elf's eyelash, draw the string on his shirt, and sign and date it.


Tricia Kennedy - Instagram
Begin by stamping the bicycle from the WC Bicycle Set in 565 Deep Blue, stamp it off onto a scrap piece of paper then add 969 Chocolate and stamp onto your watercolor paper. The combination of both colors will result in a gray tone. Watercolor the Art Impressions way with water and a paint brush. Next stamp in the foliage from the WC Foliage Set 4 in the basket and around the tires using 158 Dark Olive on some leaves and 177 Dark Jade on others. Mask off the bottom of the basket with masking paper or a post it note, then stamp the flowers from WC Flower Set 2 in 725 Rhodamine Red. Scribble a little 528 Navy Blue on your palette and brush onto the bike. Darken up the basket, seat, etc. with a bit of 969 Chocolate. Also add in tire spokes with the small tip of 969 Chocolate. Brush in the sky using 526 True Blue. Add dot detail around the flowers with 725 Rhodamine Red. Finally, stamp the sentiment from Sentiment Set 2 in your favorite black ink. I cut out the design and mounted it to the card with foam tape for added dimension.


Tricia O'Bin - Blog - Instagram - YouTube - Pinterest - Facebook
Step 1: Container
First, I inked up the container from the New Decorative Jar Set using 969-Chocolate and 569-Jet Blue. Pull the color out of the lines from the edges working your way in. In order to create the texture, add additional color in an up and down brush stroke, this creates the look of smooth metal. Make sure to leave your highlight in the middle of the container as well as along the top of the spout.

Step 2: Foliage
I inked up the leaves in the New Foliage 4 set with 177-Dark Jade. I stamped the leaves (5 times at least) along the top of the container. Make sure you leave enough space for the flowers. I added water to the foliage. 

Step 3: Flowers
I inked the flower blooms from the Bible Flower set using 905-Red and stamped three blooms. I then inked up the small flower bunch from the Mini Flowers set with 606-Violet. I added 4 additional flower bunches. I added water to the blooms starting from the lightest area. I inked the stems from the Bible Flower set using 847-Crimson and 177-Dark Jade. I added water to the blooms. To fill in the middle of the bouquet, I added some additional foliage from the New Foliage 4 set.

Step 4: Cobblestones
I used a piece of post-it tape to mask the bottom half of the container. I inked up the cobblestones from the Cobblestones set with Chocolate and Jet Blue. I stamped it off and then stamped it under the container. When pulling the color out of the lines, make sure to pull it from below the stones to make them pop. I added some 476-cyan to sides of the container to show sky.

Step 5: The Card
Make sure you sign your work. I placed the watercolor piece in my MISTI stamping tool and inked up the “Blessed & Grateful” with Gina K Designs amalgam ink and stamped it along the bottom of the container. 

Next, I cut the watercolor piece out with the new Hexagon double stitched die. I also cut a mat from peach cardstock using one size larger Hexagon die. I popped up the watercolor piece using foam tape. I adhered this to a piece of white cardstock cut to 3.75 x 5 that I ran through my big shot using a hexagon embossing folder.

I adhered this onto a Edible Eggplant card stock mat. I adhered this to a side folded card base.

Just LOVE these cards! They are the perfect inspiration for our new Floral Cards challenge! It may still be wintery in many parts of the country (even at Ai headquarters in Oregon!), but that doesn't stop us from dreaming about spring! Join us by making a flower-inspired creation for our challenge for a chance to win Ai stamps!


 Here are the Challenge Rules:

✻ Please make a new card or creation. You can make any crafty item you wish; this is not limited to cards!
✻ Limit two submissions per person. You will receive extra votes if you use Art Impressions stamps!
✻ The Ai Challenge is open to everyone, international submissions are welcome!
✻ Include a link back to the Ai Blog or grab our button on the top right of our sidebar!
✻ Share the Ai love by clicking and commenting your fellow crafters.
✻ Make sure to get your link up by Wednesday, March 13 at 5:00 p.m. PST to enter your creations.
✻ Good luck and happy stamping!

Inlinkz Link Party
Before we go, let's take a look at the winners of last week's House or Cottage Challenge!

Top spot goes to...

Helen F!

Congrats, Helen! We adore how you used two of our Windows to the World stamps (Cottage Window and Greatest Gift Window) and transformed them into polaroid snapshots! Email annelise@artimpressions.com with your address to claim your prize pack!

Honorable mentions go to...

Janet K!

Heidi!
 Congrats, you two! Janet, we love your Cottage Circlet card with the gate that actually hinges open! Super clever! And Heidi, your watercolor cottage card with whimsical large florals is so pretty with those bright colors! Email annelise@artimpressions.com with your address, and select a stamp set of your choice for a prize!

Thanks to everyone who joined the challenge, we had awesome entries! Be sure to join us again for our Floral Cards challenge!

Happy Stamping!