Showing posts with label 5221 Sending Love Cubbies Set. Show all posts

Tuesday, March 25, 2025

New Belly Band Bunny card by Reneé Matarese

 Hello Ai fans!

There are some fun new releases on the Art Impressions website.

Today I've used the brand new 5804 – Decorative Belly Bands.
There was a delay in shipping initially, so my card is a bit late for Valentine's Day.

This would be SO CUTE as an Easter card though. Just swap out the sentiment with one from one of your favorite Easter sets. If the pink paper isn't your thing, Art Impressions has lots of pretty Easter sets or basic pads that have other beautiful spring colors and patterns in them.

Ai Paper Pads


I love that Art Impressions is offering so many die sets now. They really compliment their adorable images and help create such a finished and special look to your cards and craft projects. I don't think that I could pick a favorite.

Monday, February 10, 2025

Hearts for you! by Sharon Caudle

 Hello AI Fans!

Have you finished all your Valentine cards yet? How about making some tags for a treat bag or two? That's what I've got to show you today. I love making cute tags and I had a lot of fun with this one. It could be for Valentines Day, could be for Easter, it could be for any occasion! I just love how they dress up a package!! I used a lot of sets for this one, and they are all linked below if you are interested in looking at them. I started out by stamping all the images onto a Copic friendly paper and coloring them with Copic markers that are listed below. 


So that's it for me today! Thanks so much for stopping by for a visit and until next time - stay crafty!!

Copic markers used:
R01, 02, 11, 20, 22, 24 and 27
YG13 and 17
Y00, 32, 35, and 38
E51, 53, and 55
R81, 83, and 85
B00
C5 and 6


Saturday, February 8, 2025

It's a Bunny Valentine by Janet!


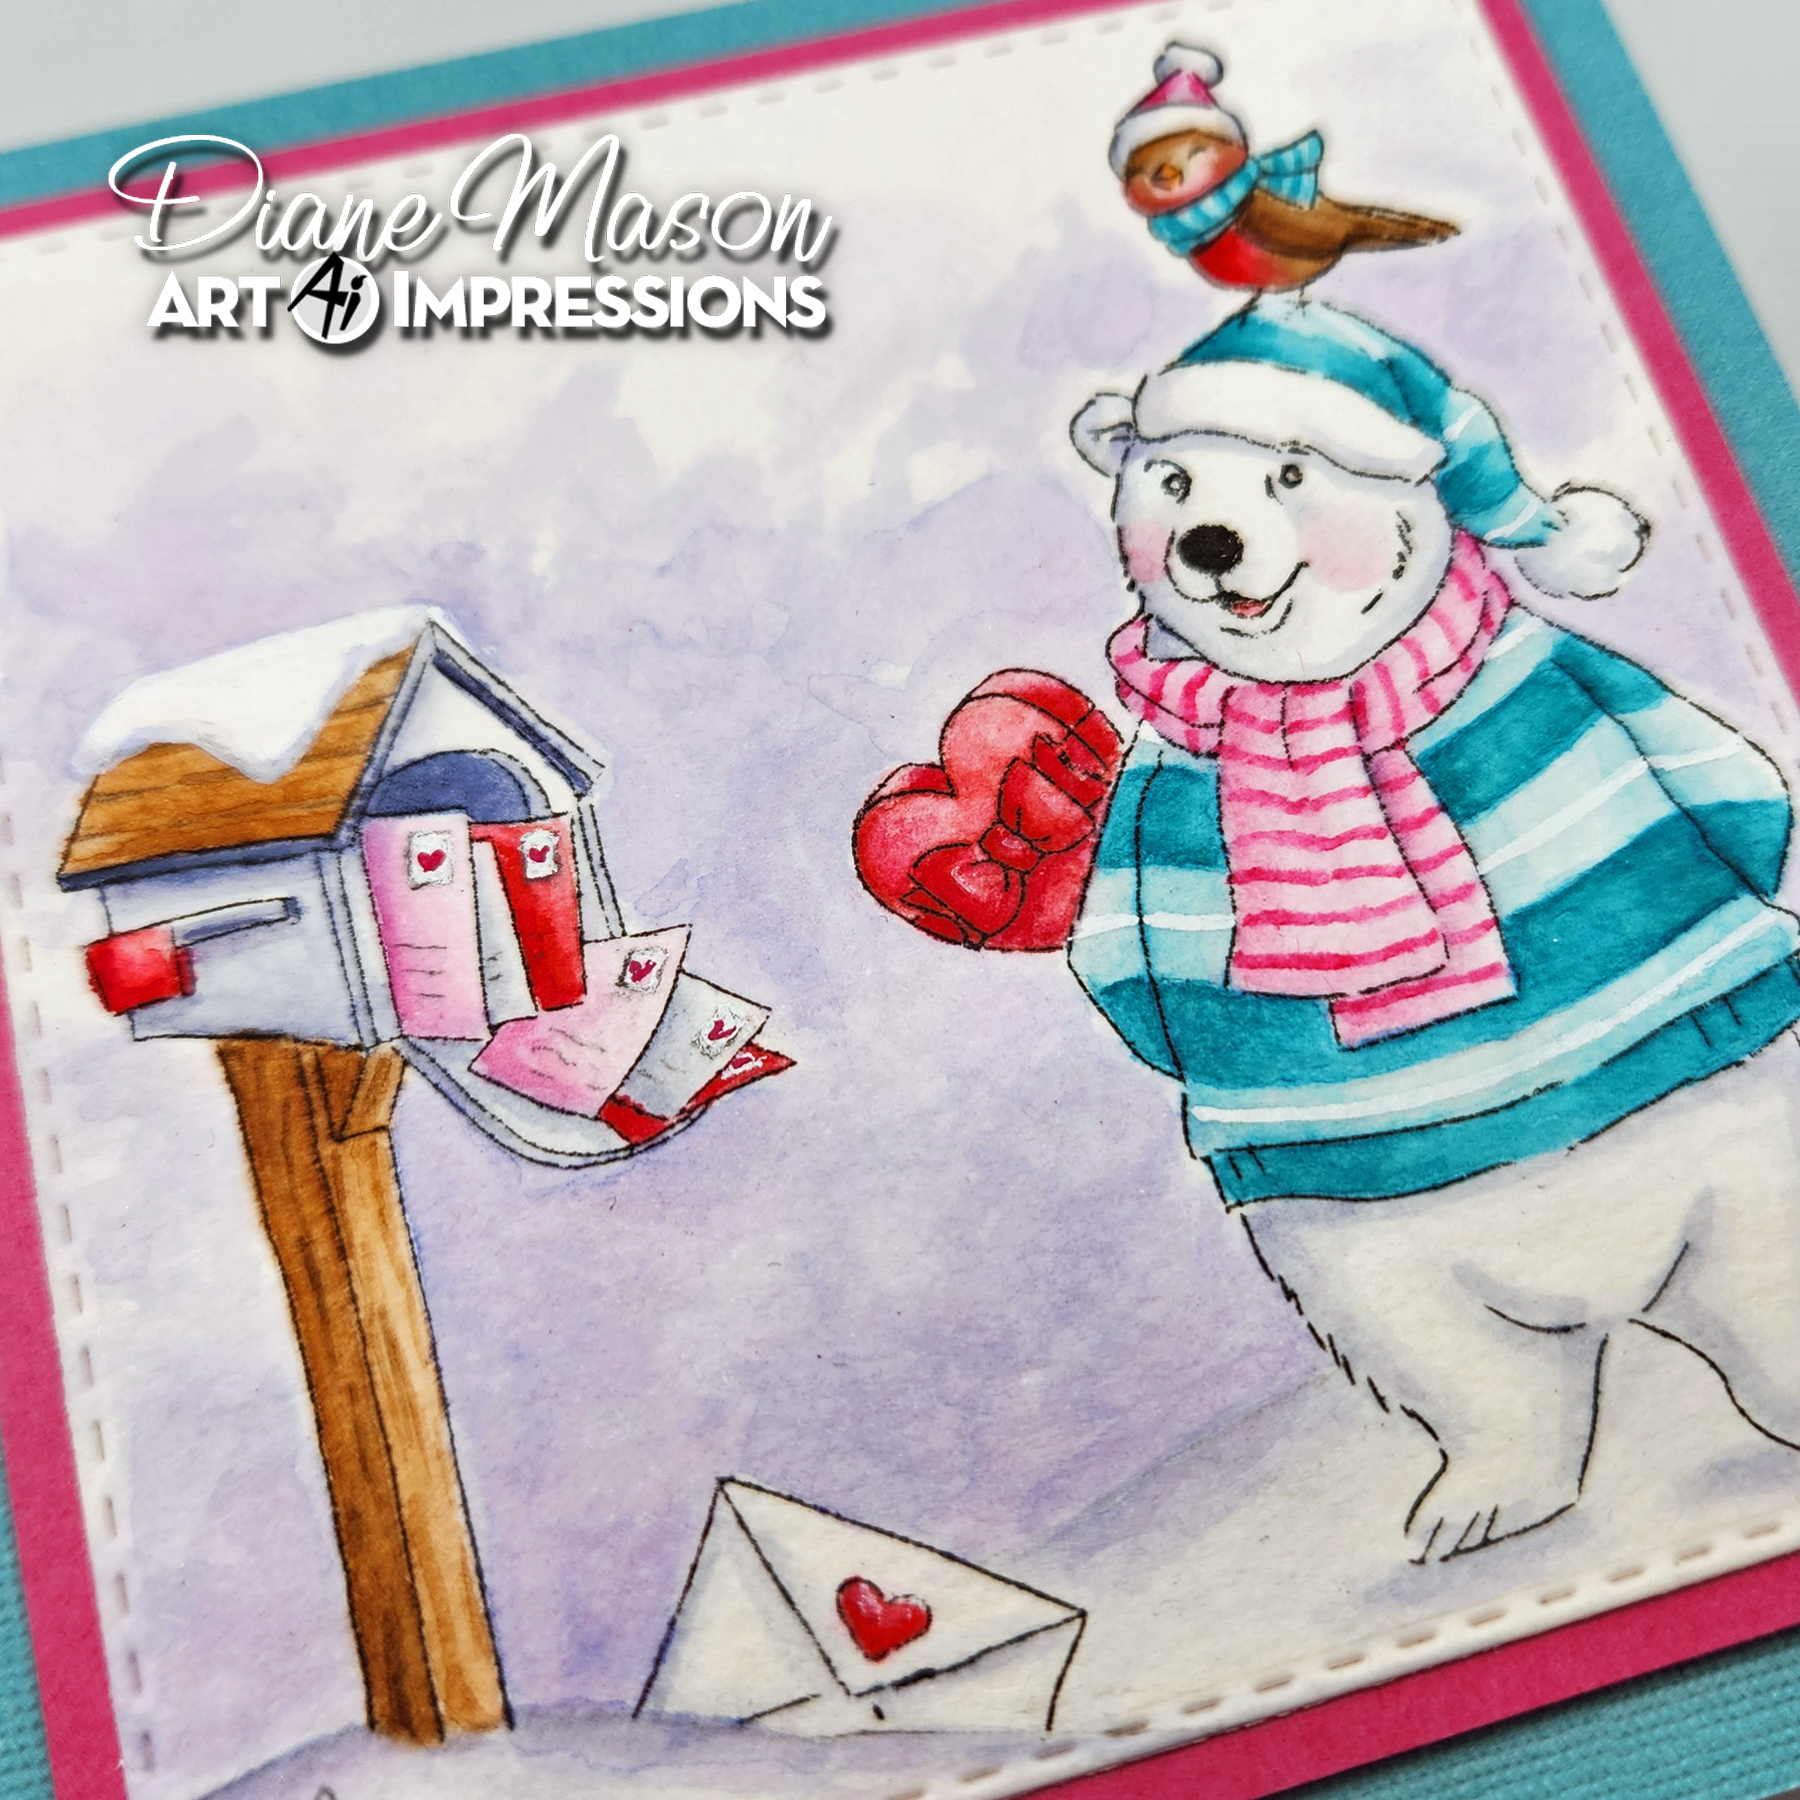
Valentine's Day is just about here! It always comes to fast don't you think? My card today is for the holiday but also celebrates the Highlights Ai card challenge going on right now on the blog. 

The set I've used in today's card is 5221 - Sending Love Cubbies. It features the bunny and a very cool mailbox. The set includes so many great accessories that can be held by the bunny in her apron and also can come out of the mailbox. Letters, presents, party hats, flowers, candy hearts, a bow, and cupcakes can be stamped, colored and cut using the dies that are included. For my card, I colored and cut out all the pieces included. 

When the dies are used to cut out the mailbox, it cuts the doors open so you can tuck items inside. It also cuts a slit in the rabbit's apron so that items can be tucked in there as well. It makes arranging the accessories so easy to do. Ai really does a great job with this, as they do with all the Cubbies sets.

In the spirit of the Highlights challenge, I used my fine line white paint pen to draw in the lines in her dress and highlight many items such as the hearts in the vine, the arrow, flower, the bunny's eyes and nose, and many other items where I felt there could possibly be a reflection.

To make this card, I started with the blue plaid background on an white A2 card. I thought this would make a whimsical sky background. Then I cut out two pieces of grass out of different green cardstocks and layered them on top of each other and at the base of the card. Before doing more, I stamped the sentiment in the left corner. To finish, I glued the mailbox in place and put the rabbit on foam pads. Then I arranged all the accessories I had colored and cut. 

There's so many great pieces in this set and although it does have a Valentine's flair, it really could work for Easter or a birthday. Adding a few eggs or a small cake with candles from your stamp stash would totally give this set additional opportunities to use it.

Thanks so much for joining me here at the blog today. As always, please visit the Ai Store for the products I used and all the things you need for your card, journal, and tag making projects. Happy creating!

Janet YouTube - Blog - Facebook - Instagram - Pinterest 

Sunday, January 19, 2025

Tweet Valentines by Diane Mason

 Hello, and welcome back for Watercolor Weekend!

Hello, Ai Watercolor Friends! I’m happy to share my first Watercolor Weekend of 2025 with you. January 1st marked my 2nd anniversary as a member of the Ai Watercolor Design Team, and it’s been a wonderful two years. Today, I have two “Tweet” Valentine’s Day cards to share with you. Let’s get started!

My first card draws inspiration from a recent watercolor tutorial by Bonnie Krebs that featured birdhouses. Although I’ve had this set for quite some time, I realized I had never used the birdhouse image—so I decided it was the perfect opportunity! While I’ve designed this card as a Valentine’s Day card, the image is versatile and could easily work for other occasions like birthdays, thinking of you, or just saying hello to a friend.

I started by inking the birdhouse image from 5739 – Birdhouse Village Set with 565 and 969, stamping it off once before applying it to my watercolor paper. Next, I stamped the flower images from the same set, using 743 and 856 for the ink. To create depth, I masked areas as needed to allow the flowers to overlap.

Using a damp brush, I pulled color from the lines of the birdhouses to create shadows and contours, adding dimension to the image. For the flowers, I pulled color from the stamped lines as well and enhanced their shapes and details with additional color from my palette. For the fine details on the petals I used a Strawberry Red and Fuchsia Pink TwinTone marker.

I painted and decorated the birdhouses with 743, 856, 565, 407, and 947. Additional details were added to the birdhouses using a Brown TwinTone marker, a Navy TwinTone, Dr. Ph Martin’s Bleed Proof White, and a good old #2 pencil.

The bluebird’s body was painted with 535 and his tummy was painted with a mix of 856 and 947. A brown TwinTone was used for the beak, eye, and feet.

Before adding the greenery, I brushed in a watery sky with 407. I placed masks back over the flowers before stamping in the leaves from 5920 – Long Stem foliage Set. I inked just the top portion of the stamp in 177 and stamped the leaves in randomly surrounding the flowers. I used a stamp positioner to help with this process. I pulled the ink from the leaves with a damp brush and added a touch of 133 for highlights and more 177 for shadows. Once dry, I pulled more color from the outside edges of the leaves to blend and fill in the background. Additional leafy vines from 4051 – WC Foliage Set 1 inked in 249 and repeating the process as above. I then added a little watery 177, 249, and a bit of 565 where needed.

I painted the flower centers with white and shaded then with 565. Additional tiny filler flowers were dotted in with a #1 round brush.

I didn’t have any suitable sentiment stamps in my stamp stash, so I created the interior sentiment using a font from my computer. I inked just the bird with N25 and stamped just above the blue cardstock strip. The three tiny hearts were drawn in using the fine point of a Strawberry Red TwinTone marker.

For my second Valentine’s card, I made a slight modification to the bear stamp from 5954 – Woodland Bears Set. This adorable bear is just too cute to pack away until next Christmas! Since February is often chilly and snowy in much of the U.S., I thought, why not create a snowy Valentine scene?

Using a stamp platform, I inked the mailbox and bear stamps with Versafine Onyx Black ink, leaving off the candy cane. I then masked the bear’s sleeve and stamped in a heart shaped box of candy from 5221 – Sending Love Cubbies. Next, I used a pencil to sketch in some snowy mounds. I masked off just below the pencil line near the mailbox and stamped in an envelope from 5221 to make it appear to have fallen in the snow. This bear is very popular—just look at all those Valentine’s he has received!

I brushed in a watery winter sky with 565 and added shadows to the edges of the snow mounds.

Now I’m going to let you in on a little secret, I have a love/hate relationship with the 565 marker. It’s a beautiful color, but I don’t always like how it looks because it tends to look a little too purple-y. As mentioned above, I did use 565 for the sky and a little more on the snow mounds. However, I used a different marker to shade the bear and the mailbox. To get those nice blue tones, I used a Marvy LePlume II marker in No. 86 African Violet! Feel free to continue to use 565 in its place, but for me, I’m loving this marker for shadows.

I used the following colors to paint the mailbox, bear and bird:  856, 743, 403, and 947. For darker shadows on the post, I added a little 969. And to darken some of the red areas, I used 847. For the stripes on the pink scarf, I used the bullet tip of 743 to draw in the lines and then went over the lines with a damp #1 round brush. Details were added to the envelopes with a pencil, Dr. Ph. Martin’s Bleed Proof White and a Strawberry Red TwinTone. Dr. Ph. Martin’s was used for white stripes on the bear’s sweater and the snow on top of the mailbox. A brown TwinTone was used to add details to the post and roof of the mailbox. To finish off the bear, I added a little watery 856 to create his rosy cheeks. The painting was die cut using the largest square from 5061 – Square Double Stitched Dies.

For the interior of the card, I changed the sentiment and repeated the same process as the first card.

I hope you have enjoyed and been inspired by today’s cards. Thank you again for stopping by for Watercolor Weekend. Until next time, Happy Painting!


Saturday, December 21, 2024

Janet's Top 10 for 2024

 Hello Ai Fans! It seems impossible but 2024 is coming to a close. It's been a wonderfully creative year as a design team member of Art Impressions. I am honored to be here every week to share an AI creation. It's truly a joy. As is the custom, I'm sharing with you my top 10 projects of the year. They're in no particular order as there is no way I can rank them. I love them all! So here it goes. I hope you enjoy the trip down memory lane.


I wish you all a very happy holiday and a fantastic 2025! As always, please visit the Ai store for the products I used and all the things you need for your card, journal, and tag making projects. Happy creating and see you next year!

Janet YouTube - Blog - Facebook - Instagram - Pinterest  

Thursday, July 11, 2024

FairyLand PopUp Card by Dori Mendiola

 Happy Thursday AI Friends!

Today I'm sharing a card that was inspired by the current challenge - Magical Creatures.  I decided to make a popup tunnel card using the new 5915 - Woodland Fairies and 5916 - Woodland Castles.  This type of card provides several layers so that you can display many of the little fairies.  From of this set, I was able to place five, out of the eight, nicely on this card.


I started with the background by inking up three panels of 6 x 6 Strathmore Bristol Smooth cardstock with Ranger Distress Oxide Spray.  I used tumbled glass and prize ribbon for the top portion of the panels and shabby shutters and mowed lawn for the bottom portion.  Once dry, I brushed on a layer of Ranger Distress Glaze over each panel and wiped off the excess.  I placed some Dr. Ph Martin's bleed proof white paint on my glass mat and diluted with some water.  I then dipped a No. 5 paint brush into this mixture and spattered onto each panel by tapping the brush over my finger onto the cardstock.  This will create a magical background.  I determined which panel I wanted for each layer of the tunnel and used the 5065 - Double Stitched Oval dies to cut the top two layers using the largest ovals.  Cut the forefront panel first with the largest die and then place the middle panel under the forefront and place the second largest oval die to cut the middle panel.

To make the popup feature, I used 80 lb. cardstock and cut two pieces of 2 1/2" x 6 ".  Score each piece every 1/2" lengthwise to form the side popups.  You should have four score lines on each piece.  Fold and score each (mountain, valley, mountain, valley).  Refer to picture below for adhering each background panel.  You may need to trim the middle layer down slightly so that it lays flat when popup is pushed down.


I stamped all of the images onto copic friendly paper with Memento black ink and colored with my copic markers listed below.  Using the coordinating dies, cut each of the images.  I used green polka dot paper and die cut with a grass die I had in my stash.  I inked the grass tines with mowed lawn oxide ink so it matched nicely to the background.  I stamped the sentiment, included in the 5915 - Woodland Fairies stamp set, onto a cloud die cut.  Lastly, I used stickles on the fairy wings to give them some sparkle.

This popup card will lay flat in an envelope and pop up when you take it out.

I hope you enjoyed my "magical" card.  Have a wonderful crafty day!  

Remember to join our challenge to win a free stamp set.  Check out the tab "Bi-Weekly Challenge" above to participate.


Copics used:  B0000, B00, B12, B14
C1, C3, C5, C7
E000, E00, E11, E21, E23, E50, E51, E53
R11, R12, R14, R20
V12, V15
Y21, Y23
BG000
YG41, YG45


Friday, May 17, 2024

Gnome Magnet Treat Box by Dori Mendiola

Happy Friday AI Friends!

Today I have a fun little treat (pun totally intended - LOL) that goes with the "Just For You" challenge.  Who doesn't LOVE Gnomes?  I decided to make a little gnome magnet to go with this treat box.  He's tucked away in a little pocket but can be removed to reside on the fridge, a teacher's whiteboard or in your scrapbook room on a magnetic surface.  

He's so darn cute!  


I used the Art Impressions #5832 Gnome paper pack for the treat box as well as the pocket that the gnome sits in.  The Gnome is from the #5785 Gnome set which has the matching dies.  I stamped the front only of this little gnome onto copic friendly paper and colored him with copic markers (see color list below).  After coloring the gnome, I covered him with a piece of clear packing tape to protect the coloring and make him sturdy.  I then die cut him with the coordinating dies and also cut a corresponding piece of adhesive magnet to attach to his back side.  I colored and die cut a few other images from #5728 Mushroom Cubbies and #5221 Sending Love Cubbies to decorate the pocket, which is from the #5718 Mini Journal Template set.  

Treat box:  Dimensions 5 x 1 1/4 x 1.  Use one piece of 6x6 paper.  Score (pattern facing up) at 1, 2 3/4, 3 3/4 and 5 1/2.  Turn clockwise (pattern facing to the right) and score at 1, 4 1/2 and 5 1/2.  Score each of the lines with your bone folder.  With pattern facing up, cut off the bottom right corner piece (s/b 1/2" x 1"). Then across that same row, snip each score point up to the nearest fold to create the bottom of the box when folded in.  Put glue on the pattern side right edge 1/2" piece (above the cut off corner).  Fold into a box shape and seal the glued edge inside.  Lastly fold in the slit pieces (small pieces first) then glue inside of one large piece and seal to create the bottom.

Fill the box with candies and give to a teacher, friend or just for you.   

Hope this brings you a smile!  Thanks for stopping by!
Copics used:  C00, C01, C02
E00, E02, E11, E53, E55, E57
 B91, B93, B95
R22, R24, R27 
YR21, YR23, YR24
YG03, YG17, YG63


Friday, March 1, 2024

Sending Easter Wishes Card by Tasha

 Happy Friday Ai Friends!

Tasha here sharing an Easter card featuring the sweet bunny from the 5221 - Sending Love Cubbies Set. This set is adorable and is perfect for Easter/Spring cards!


I started by stamping the bunny and letter before using the included coordinating dies to cut the images out. The mailbox also has a die and opens, but I stamped it directly on to the card. This bunny looks so cheerful!

For the background, I used markers to create the grass and added puffy blue clouds with a stencil and Distress Oxide Ink. For a little extra detail, I attached several teal enamel hearts to the sky. The tiny hearts are perfect for this type of card and I love the color!

After the ink dried, I stamped "Easter Wishes" from the 5733 - Easter Sentiments Set. The handwritten greeting looks so pretty and goes well with card's theme. 

Lastly, I added a layer of Ai pattern paper, pink paper, teal glitter pattern paper, and cream plaid paper. I think this card is great for Easter, but it could also work for a birthday, or as an everyday card for someone special!

I hope you enjoyed today's project and are having a wonderful day!


Saturday, February 10, 2024

Valentine Bunny by Janet


 It's the weekend before Valentine's Day so I've made a very cheerful valentine which can be given to nearly anyone, from sweetheart to child and even to a best girlfriend. The cute rabbit and sentiment are from the 5221 - Sending Love Cubbies set. I cut two XO's in pink and red using the 5072 - Block Letters Die Set. I offset each letter and used a white acrylic marker to put faux stitches on the pink letters. I cut a heart in pink from 5721 - Nested Heart Dies and placed it behind a glittered ephemera heart and flower. I cut the sentiment and the lace border on the top with dies from the 5543 - Journal Template Die set. The pink and white background came from 5741 - Valentine PP.

There are many different Cubbie sets in the store and they can be used as intended or used as I have here. I made a letter and the bow from the set and attached it to the bunny. She's so adorable all by herself and has such a sweet expression. There are many other small accessory images that can be used to decorate cards or scrapbook pages. If you have Cubby sets, I invite you to take a fresh look at them and try using them on their own as I've done on this card.

Thanks for stopping by today. I hope you'll stop by the store to see all the things you need for your card, journal, and tag making projects. 

Janet YouTube - Blog - Facebook - Instagram - Pinterest