Showing posts with label Ai Dogs. Show all posts

Friday, November 3, 2023

Dachshund Through the Snow Card by Tasha!

 Happy Friday Ai Friends!

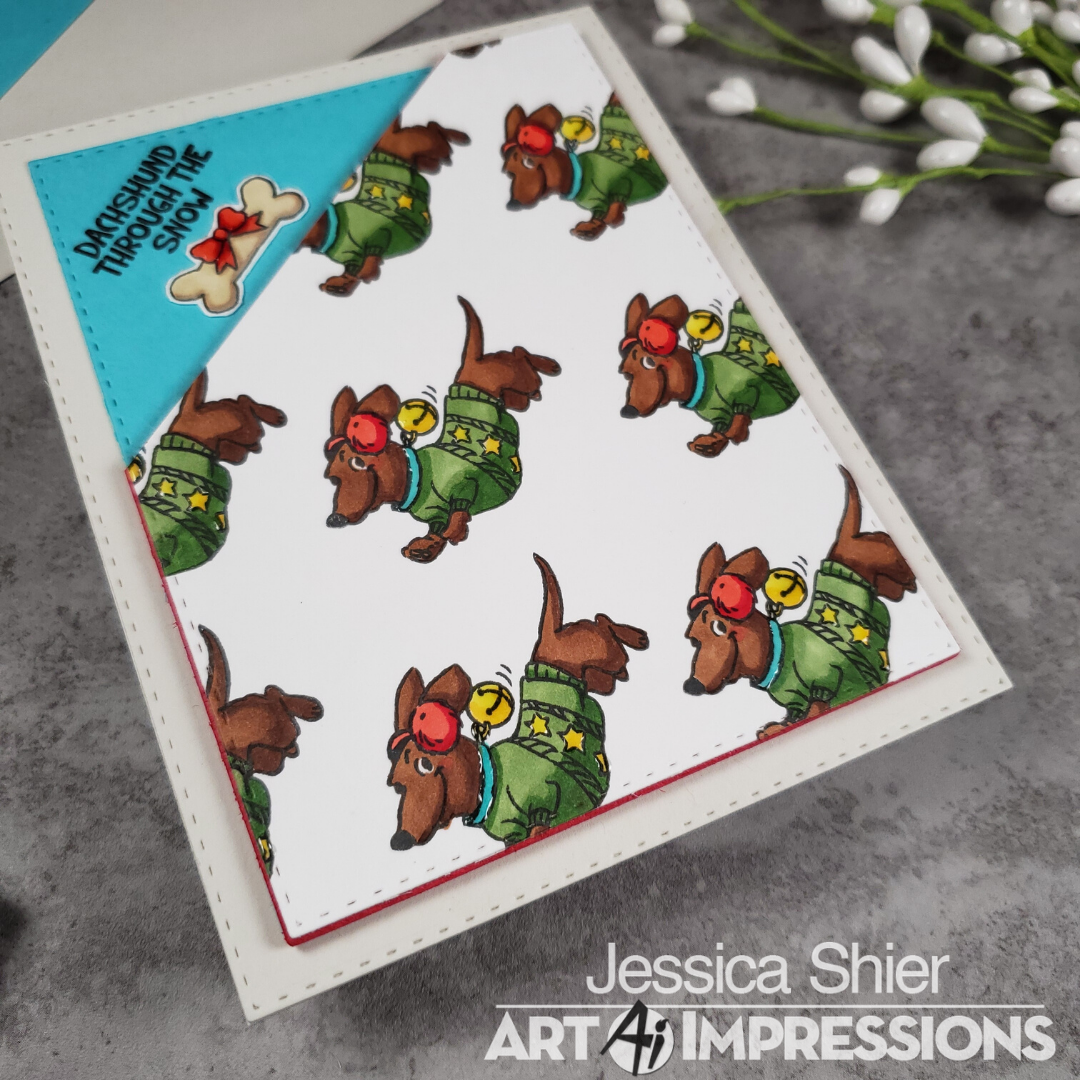
Tasha here sharing a new holiday card featuring the Art Impressions 4937 - Santa Paws Set. This design was also inspired by the current "You're Such a Square!" Challenge; it's so much fun make square holiday cards!


To begin, I stamped the little doggie and colored his festive clothing with markers before cutting him out. I also added foam tape and a little light gray shadow under him to make it look like he was jumping in the snow. I think his little winter outfit and the large bell are too cute!


For the background, I used a piece of snowflake pattern paper for the sky and attached a stitched hill for the ground. I also used Distress Oxide Ink for some extra blue color; I think the blue makes the white pop and look more like snow.


The greeting "Dachshund Through the Snow" was stamped with a light blue ink to coordinate with the snowy scene. I also attached layers of black, pink, and blue glitter paper to bring in more color and complete the project.


I hope you enjoyed today's card and will participate in the "You're Such a Square!" Challenge!


Friday, October 27, 2023

Pawsome Holiday Card by Tasha!

 Happy Friday Ai Fans!

Tasha here sharing a card inspired by the new Ai "You're Such a Square!" Challenge. We are heading into the holiday season and the 4937 - Santa Paws Set is "pawsome" for Christmas cards! This little dog would also look great on tags and scrapbook layouts!

The little doggie was stamped with black ink and colored with markers. I think his holiday sweater is just so cute and this would totally be something I would make my dogs wear; I also love his hat!


For the greeting, I used one of the included sentiment stamps and this one goes perfectly with the over-dressed dog. I also added green distress oxide ink and white dots to the background to make the center around the greeting glow and I thought the white dots looked like falling snow.


Lastly, I added a piece of holiday pattern paper and layers of green card stock and green glitter paper before attaching the card to a white squared card base.


I hope you enjoyed today's card and will join in the Ai "You're Such a Square!" Challenge!


Friday, January 6, 2023

Happy Birthday Card by Tasha!

Happy Friday Ai Fans!

Tasha here sharing a Birthday card created with the sweet 4959 - WC Dogs Set and 5561 - Birds and Bugs Set. This card is so cheerful and goes with the "Let's Celebrate" Challenge!

I started by stamping the two doggies and butterflies with black ink and coloring them with Copic Markers. The Birds and Bugs Set includes coordinating dies, so it was super easy to cut the images out. Having the butterflies cut out allowed me to layer them on the dogs to look as if they were fluttering around. The puppies look like they are having fun!


For the background, I used markers to create the grass and a light blue sky. I also stamped a "Happy Birthday Friend" greeting directly on top of the grass. The center card is smaller in size, but it's a cute little scene that is perfect for a special friend's birthday.

Lastly, I attached layers of blue paper and a paw print pattern paper to coordinate with the puppy theme. I also love the orange and blue color combination!

Thank you for checking out today's card and I hope you all are having a wonderful day!


Friday, October 7, 2022

Let it Snow Card by Tasha!

 Happy Friday Ai Fans!

Tasha here sharing a card created for the Ai Buttons & Bows Challenge. I used the 4937 - Santa Paws Set for my card; I just love this little doggie!

The sweet little doggie was stamped with black ink and colored with Copic Markers. I thought it would be fun to have it look like it was snowing. To achieve this, I used Distress Oxide Ink to bring in some color and added little white accents with a white gel pen. I also added snowflakes on top of the dog and bone.

To go with the snowy scene, I stamped "Let it Snow" from the new 5566 - Christmas Sentiments Set. I stamped the greeting with a teal ink color to go with the teal and red color combination I used on the holiday lights and bows. 

Lastly, I attached a gold glitter paper, red card stock, light blue card stock, and a piece of pattern paper. This paper also has bows on the gifts to go with the challenge theme.

Thank you for checking out today's card and I hope you will join in the Buttons & Bows Challenge!


Have a wonderful day!


Saturday, April 3, 2021

Steppin' Back Saturday - A Teeny Weenie Hug! by Janet


Hi everyone! I made this card today as a special request for a friend of mine who loves Doxie's. After I told her I had joined the Ai Design Team, she sent back a photo of the Dog Twist Tie set from the store and asked me to make her that. I was not going to disappoint her so here it is!

The truth is she really didn't need to "twist" my arm to make this card. The Twist Tie line is so much fun. I made a video giving 5 tips for making Twist Tie cards. It includes how to line the inside with cardstock, stamp and die cutting tips and more. You can click on the video below to get these tips.


I colored the dogs and the scene with Copic colors:
E39, E37, E35, E33, E31
C9, C7, C5, C3, C1
G28, G20, YG63, YG25
R37, RV32


If you have a Twist-Tie stamp set, take it out and give it a try again. If you were always intrigued but didn't give it a try, visit the store and the many different Twist-Tie themes available. 

Happy Creating!

Janet YouTube - Blog - Facebook - Instagram - Pinterest


Friday, February 7, 2020

Teenie Weenie Hug | By Jessica Shier

Hello Ai Fans!
 This week for Art Impressions I'm using the Dog Twist Ties stamp set. I was really inspired by the sentiment "sending you a teenie weenie hug", So cute! I am a dachshund lover. I wanted a color combination of purple, green and teal, very calming colors. 


The fun thing about these Twist Tie style of stamps and dies is that they lock together. The directions on the back of the package are easy to follow and give you the measurements to create your own tryfold card base.  Art Impressions does carry tryfold bases but I found it simple to create my own. 

Following the directions on the back of the packaging I scored a 9 1/2'' x 5 1/2'' card base at the 2 3/4'' and 7'' marks. The flaps are where you will stamp the weiner dogs. Each one has a little L on the bottom corners that you don't ink up but align that with the corner of your panels. 

After stamping each dog on their panels, I used the coordinating dies and sent them through my die cutting machine. Now that I have everything cut and stamped I can start coloring. I colored one of the dogs black and tan like my little weiner dog, Sobe, and the other in browns.


Using a small acrylic block I stamped the paw print in two different colors all over the front of this card. The paw print is from a different Art Impressions stamps set, Doggy Kisses. I also used one of the sentiments from that set on the inside. First though, I used a Distress Oxide ink to ink blend the inside and stamped the sentiment from the Dog Twist Ties. 


The second sentiment on the inside is stamped on a small rectangle die cut. My way of covering up my very crooked first attempt at stamping that sentiment. lol. 


Copic Markers
W6, W4, W3, W1, W0
C5, C3
E57, E35, E34, E31
R14

Alright everyone, that is it from me today! 
Thank you so much for joining me. Happy Stamping!


Friday, December 6, 2019

Dachshund through the Snow | By Jessica Shier

Hello Ai Fans!

I wanted to share another card using the Santa Paws set. I also have a card process video for you! My last one for the 2019 year on the Art Impressions blog. For this card, I stamped the little Dachshund multiple times to create a pattern. I have a little Dachshund so I had to use this stamp!


Watch the video here.


I used some Copic friendly pigment ink and hand stamped the Dachshund image at an angle on a piece of Neenah 80lb cardstock. To color this little cutie I took inspiration from the packaging of the Santa Paws stamp set. I also was going for a herd of Dachshund look. Which is a conversation that my Brother in-law and I had, haha.  I'll have all the Copic markers I used listed below. 


After stamping the Doxies and coloring them I used a Art Impressions Rectangle Double Stitch die (2nd largest) and die cut the herd of Dachshund panel, a aqua blue cardstock and red craft foam. I also used the largest Rectangle from that same die set to die cut a piece of light gray cardstock. 

Before I proceeded with cutting the triangle I stamped the sentiment "Dachshund through the snow" on to the aqua blue cardstock and also stamped and fussy cut the little bone with the bow. I used the same technique to color the bone with Copic Markers.


All I have left to do is chop the corner so that you can see the sentiment and bone and adhere all my layers together on to a A2 cardbase. 

Copic Markers Used:
R29, R14
YG67, YG63
Y15, Y02
E59, E57
BG15
E81, E43

Thank you so much for joining me today!
Happy Stamping.


Friday, November 22, 2019

Happy Howlidays | By Jessica Shier

Hello Ai Fans!

I knew this Holiday season I had to use the Santa Paws stamp set. These pups are too cute! I decided to use the pawsome carolers, which is one large stamp and keep my color scheme to a minimum. Of course these jolly dogs would be howling their howliday carols in the presence of a full moon. 


I stamped the large image of the dogs onto a piece of Neenah 80lb cardstock using Copic friendly black ink. The Santa Paws set also includes several smaller images of dogs and one of them is a Dachshund!! So, I suspect I will probably be showing more examples using this stamp set again in the near future. I have the list of Copic Marker's I used for this card down below. 


Once the coloring was done I fussy cut the stamp image out. This includes the snow landscape area too. I took a piece of black card stock and got out my splatter box. For the white "stars" I used Copic Opaque white. This is similar to a white acrylic paint. To splatter it I thinned it a little with some water onto a acrylic stamp block and used a paint brush to flick it on to the card stock. I like doing it this way because I have control over how much splatter I add. Then I set it aside to dry. This doesn't take long.


While the background dried I used a large Art Impressions Circle Double Stitch die to cut out a piece of yellow cardstock. I mounted that to the now dried background with the white splatter. Before adding the caroling dogs I stamped the sentiment with Versafine Clair Nocturne ink on to the dog scene. Then I mounted that to the card front with a bit of foam tape and circle foam dots, to add some dimension. 


Copic Markers Used:
W9, W6, W4, W3, W1, W0
C7, C5, C3. C1
Y26, Y21, E81, E43

Thank you so much for joining me today!
Happy Stamping.


Friday, April 26, 2019

Sit... Stay... Heal... | Doggy Kisses By Jessica Shier

Hello Ai Fans!

This week I'm still creating with dog themed cards. I loved playing with the Doggy Kisses set and was inspired to create this homey scene with the little sick dog holding his teddy bear. 


I started with stamping the sick dog on a piece of Neenah Solar White 80lb cardstock. Then I sketched out the couch with Copics and colored everything in. I've been loving this orange and aqua color combination lately so I made the couch a yellow orange color and the pillow case and slippers aqua. I repeat these colors and add in a bit of the red and more gray through out too. 


Creating scenes like this one is so easy. After coloring the couch and dog I used a T-square to draw in the baseboards then colored the floor is cool grays. I used two of the smaller Hexagon Double Stitched dies to create some picture frames. I used the cut outs to stamp two more dogs to act as the photos. Those two had the best faces for this!  I colored those then adhered them in to their designated spots after attaching the main panel to a Neenah Solar White 110lb card base. I also colored around the outer edge of the hexagon cut out with several copics to colore the frame. For the final touches, I used the small paw print to frame the Dachshund image and stamped the sentiment with black ink. 


Copic Markers Used:
W9, W6, W3, W1, W0
C5, C3, C1
E81, E3, E34, E31
YR27, YR23, YR04
Y38, Y35, Y23, Y21, Y15, Y13
R83, R39, R27, R14
BG13, BG11, BG10
BV04, BV01

Ok guys that is it from me! Thank you so much for joining me today. Happy Stamping


Friday, April 19, 2019

Happy Tails Slider Card | By Jessica Shier

Hello Ai Fans!


I've been really enjoying the Art Impressions Stacker sets and knew I wanted to play with the dog stacker. Honestly anything with a Dachshund and I want to color it, but this is truly a fun dog pile! I also made the paw print with dies, so easy!


I started with die cutting the slider mechanism, per the instructions on the back. A good dry adhesive is what I used. Some quick measuring and I cut the slider pull with a watercolor paw print pattern paper. Then attached a small piece of black ribbon in a loop using the Tiny Attacher and ink blended the slider frame with a distress ink. Gradually blending out to the white cardstock.


The last two details took some trial and error. I used a small blending brush to flick a Distress Oxide reinker  and water mixer on to the white back panel. So messy! A random brown box does well to keep most of the spray contained, plus reusable!

So those tiny little dots took some time to dry even after heat setting. While I waited I started on the paw print. For this I was able to use 2 dies, the smallest from the Double Stitched Oval die set and the tiny oval from the Double Stitch Tag die set. It's a little oblong and if I had a nice heart shape I could have used that as the large pad, that would be super cute. This is when I also chose to stamp my sentiment. This one says "Happy tails to you my pal" . Using a clear sitcky ink and white embossing powder.


The fun part was coloring the dogs, using Copics, my plan was to have 3 different shades of dogs . Once again I was inspired by the packaging art! But, I didn't see the little guy at the top! So he's the only one in grays. lol. Which I thought worked and made a second one just like the first! The copics I used are listed below. 

Copics Used.

Beige - E81, E43, W3
Tan - E31, E35, W3
Dark Brown - E77, E74, E59
Gray - W6, W3
Tongue - R14

Thank you for stopping by today! Happy Stamping!