Showing posts with label Ai Circle Double Stitched Dies. Show all posts

Thursday, October 24, 2024

Witchy Spinner Card by Dori Mendiola

Happy Thursday AI Friends!

Halloween is almost here so I wanted to get one more card in before the witching hour.  😃
This one was created using the #5506 - Peek a Boo set.  This set has the cutest little characters plus an interactive window along with dies for each.  Such a cute fun set!  Several other sets were used to create the final card so make sure to check out the links below.


I started by stamping the images onto copic friendly paper and coloring with my copic markers listed below.  After coloring, I die cut each of the images out with their corresponding dies. 

To make the interactive spinner card:  I first cut a black A2 size card base.  I layered a piece of patterned paper (web pattern from the #5849 Halloween S2 PP) onto the front of the card base.  Then I cut a circle out of the front of the A2 card base (I used the #5064 Double Stitched Circle dies).  Keep this inner circle for later.  For the inside, cut a 5 3/8 x 8 3/8" piece of black card stock.  Score and fold at 2 7/8, 5, 6 1/4 (valley, mtn, mtn).  Flip this piece over and adhere the 2 7/8 to the inside right of the A2 card base leaving a slight border.  Fold it down onto itself and place glue on the left fold side.  Hold it in place and bring the front over to close onto the fold.  It should fit right into the score of the A2 card base.  For the last step - take the inner circle from before, and with the card shut, place glue onto the right half of the inside folded piece.  Fit the inner circle back into place over the glue on the right side.  Your spinner action is now working when you open the card.
 

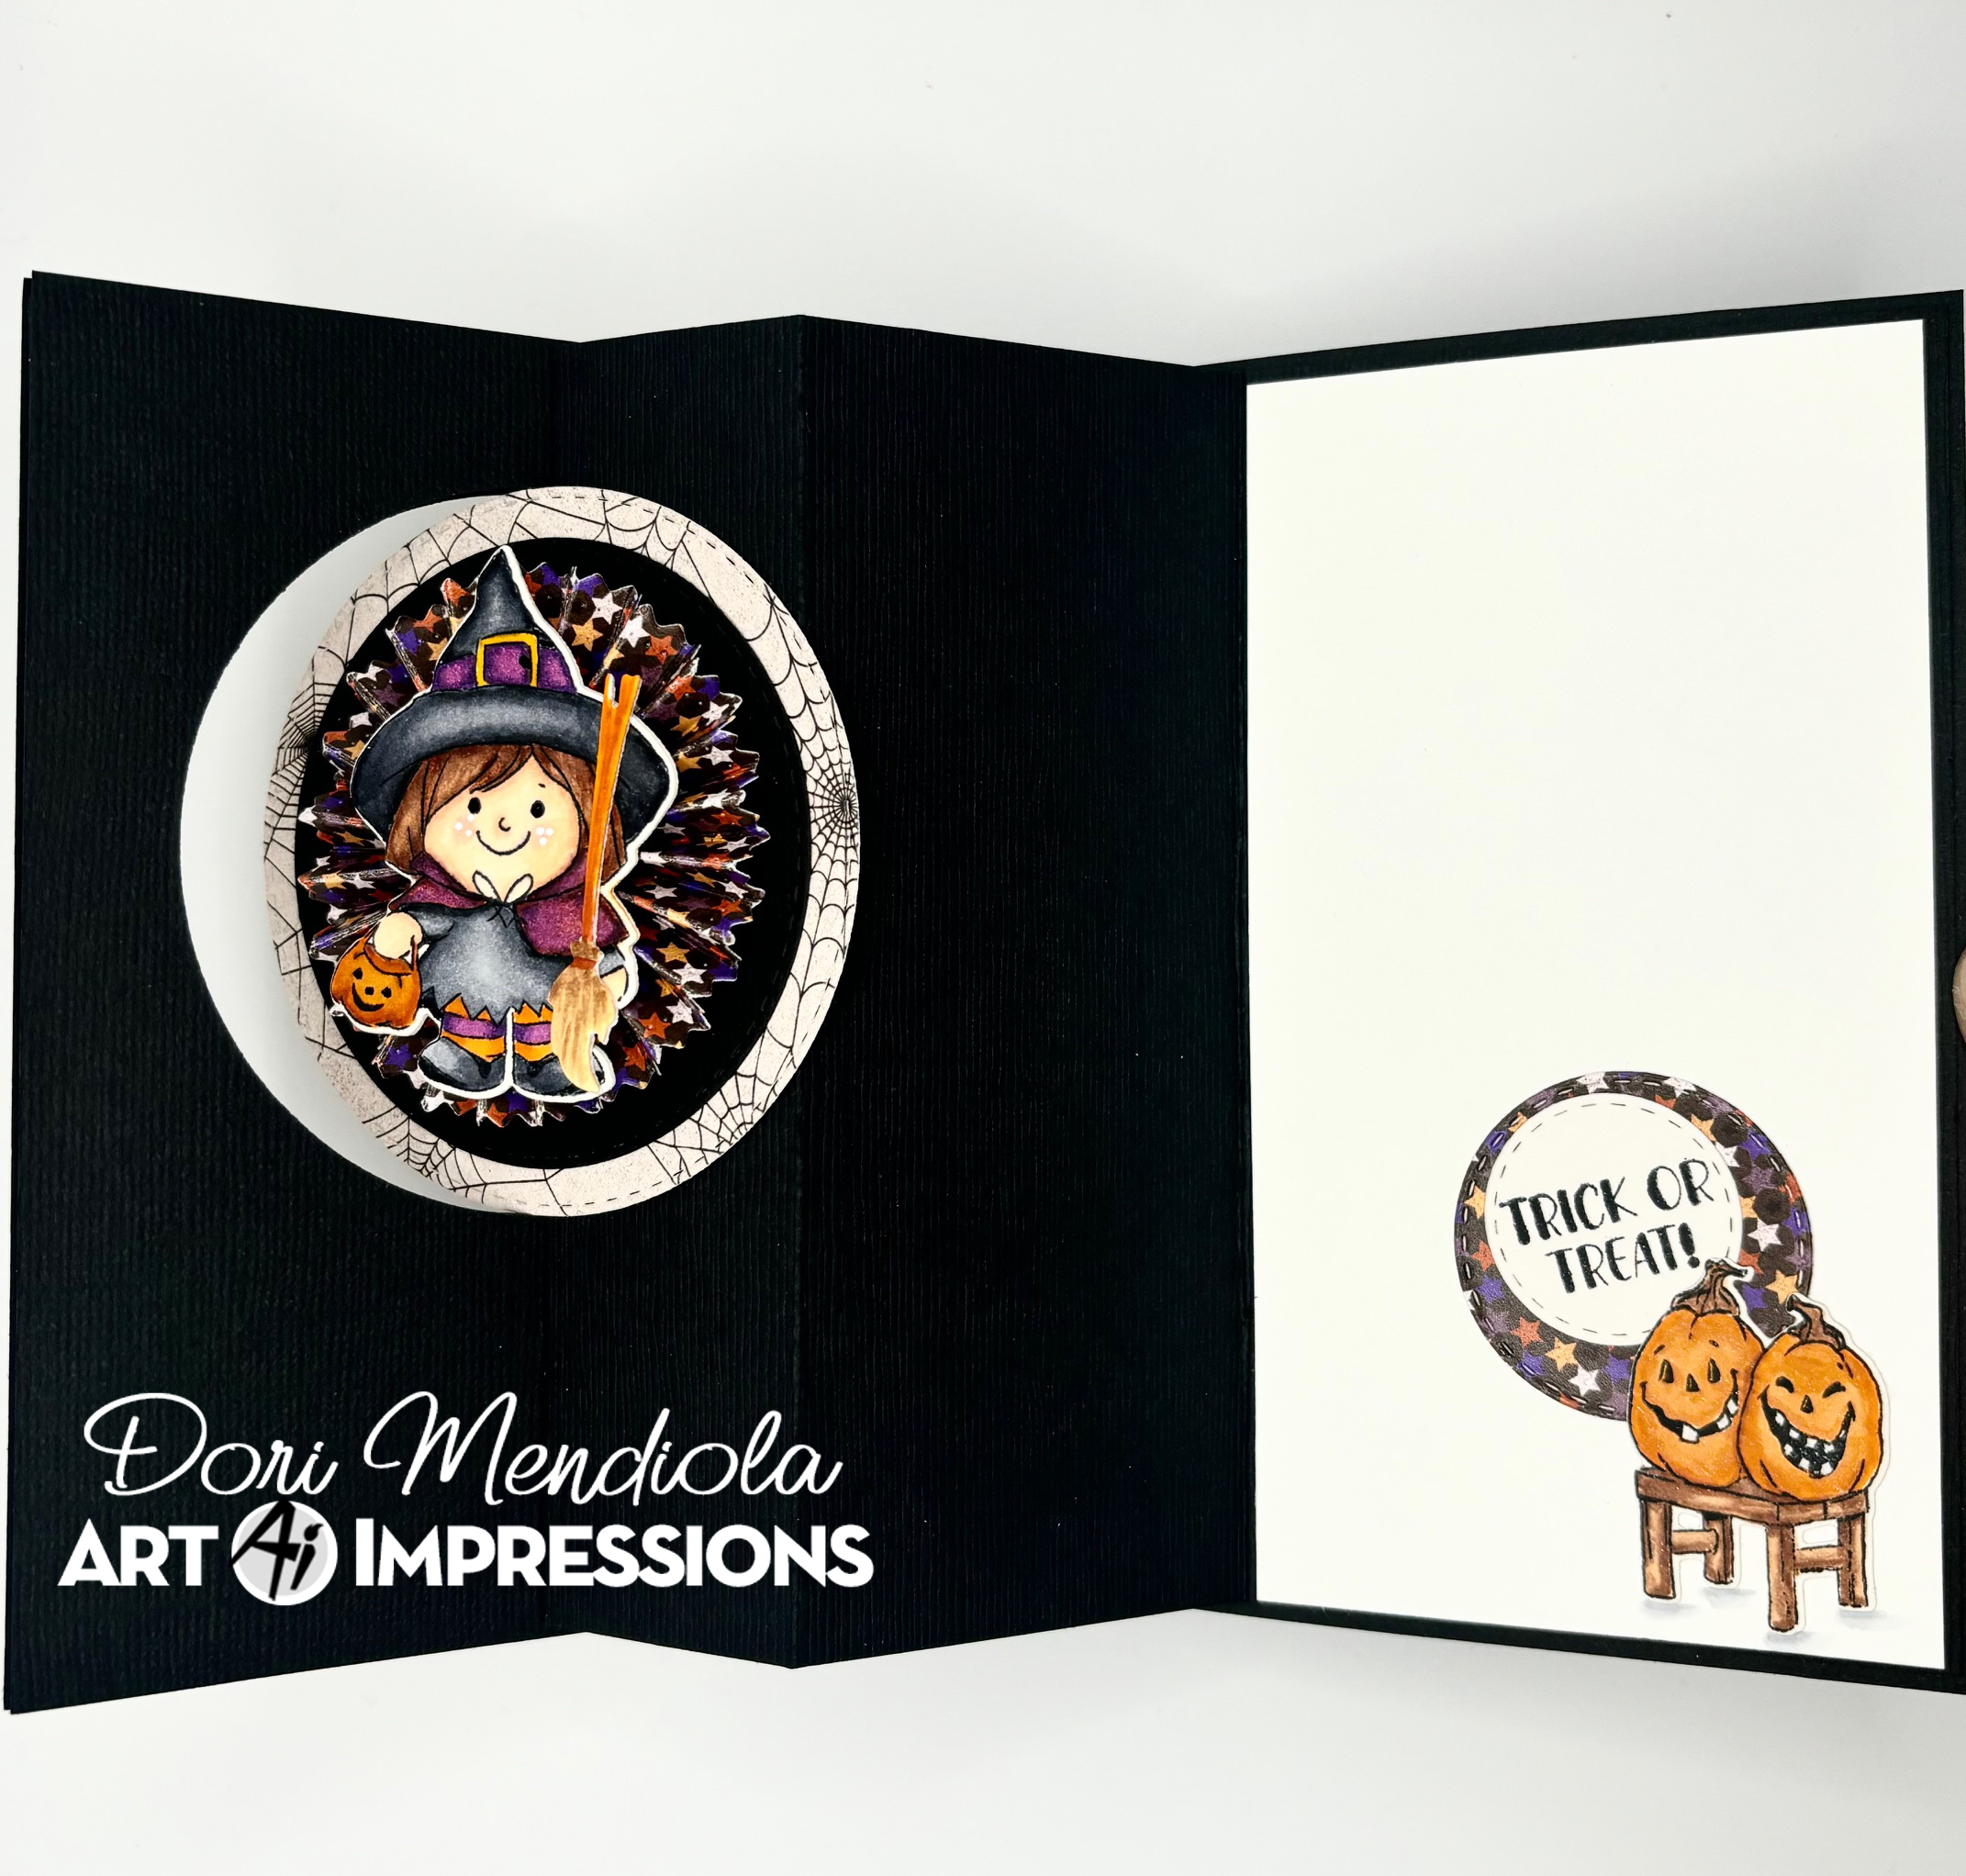
  The witch is popped up on top of a rosette.  This can be created by taking a 12" x 1" strip of patterned paper.  Score and fold at every 1/4 inch.  Glue the ends together.  Cut two circles (1/2" and a 1" approx.) out of scrap paper.  Gather your rosette into a circle and glue the small one to the top of the rosette.   Place glue onto the larger circle and carefully slide the rosette onto that circle to glue to the bottom.  Hold until both are adhered nicely.  Glue the witch to the top side of your rosette. 
As for the spider webs, I die cut two from the #5769 Halloween FB Fence set and cut one in half and half again to create the corner edges.  I took the other web die cut and used the circle die to cut a portion to place on the outside circle edge.  

Hope you have a wonderful day.
Keep creating!

Copics used: C00, C1, C3, C5, C7 
E00, E01, E11, E21, E23, E25, E53, E55, E57
R20, Y17, Y19
YR12, YR14, YR16, YR18

Saturday, August 3, 2024

You Go Gull! by Janet

 
Greeting Ai Fans! I hope some of you have been able to enjoy some beach time. Now that it's August, there's not that much time left to enjoy the beach in its summer glory. Today's card shows off a summer beach at the sunrise. If you get up early enough, you might get to see this bunch of gull friends on your beach!

This scene was created with 5399 - Gull Friends Set. It has a number of gulls and miscellaneous beachy items like the ball, shells and kites. The birds and accessories were water colored and then cut out with the matching dies in the set. The background was made on light blue cardstock, inked with yellow, orange and purple ink over a sunburst stencil. 

For the sun, I cut two graduating circles with the 5064 - Circle Double Stitched Dies. I cut the sun down so it would fit on the top of the card and then stamped it with the sentiment. I glued it to cover the stenciled sun. The sand was cut with hill dies on kraft cardstock. I inked the edges with brown for dimension. Then the sand was layered and glued at the bottom of the card. Once the background scene was completed, I arranged the birds and accessories. The final touch were three small gold glitter enamel dots.

 I get a kick out of these gulls with attitude and hope you do too. As always, thanks for stopping by today. I hope you enjoyed this fun beachy scene. Please visit the Ai store to see all the things you need for your card, journal, and tag making projects. Have a great weekend!

 Janet YouTube - Blog - Facebook - Instagram - Pinterest   


Saturday, July 27, 2024

My Hope by Janet


I have always been a fan of all white cards but I rarely make one. Mainly it's because I enjoy working with color. White, though a color, is just a bit boring for my brain which wants to "color my world." Yet, a white card can be truly beautiful too. When I saw the new 5909-Crosses Die Set, I immediately saw the card I've made today as all white. 

Although it looks like the crosses on the card are embossed, they are actually just glued to the card. Because my cardstock is light weight, it really does look like embossing except it's much deeper and more detailed in appearance. Once I cut all the crosses from the dies twice, I arranged the crosses on a 4 x 5 1/4" piece of cardstock and then glued them with liquid glue. 

The perfect accompaniment for this card face was the sentiment and flowers from the 5936-My Hope Set. I cut out a circle from the 5726-Nested Circle Die Set and stamped the sentiment on it. Then I stamped and colored several of the flowers and leaves. I colored and fussy cut them and arranged the flowers around the sentiment and glued them in place. I cut another larger circle from the Double Stitched Dies and stacked the two circles together with foam tape. Finally I glued the circles to the front of the card. The final touch was the addition of clear sequins.

This card is very peaceful and would be appropriate for many different occasions. It's definitely a special and a pretty gift to someone who believes. I think I'll be making a few of these cards for my personal stash because I like it so much.

  Thanks for stopping by today. I hope my card gives you some ideas of your own. Please visit the store to see all the things you need for your card, journal, and tag making projects. Be sure to take a look at all the new releases while you are there. Have a great weekend!

 Janet YouTube - Blog - Facebook - Instagram - Pinterest   
 

Thursday, July 25, 2024

Buzzing By by Dori Mendiola

 Happy Thursday AI Friends!

My card for today fits the All A-Buzz Challenge going on this week.  Check out the "Bi-weekly Challenge" tab above for the details and join in on the fun.  Create a card/project using insects.  I used the #5925 - Honey Bee set for my card.  What a great fun set.  It includes flowers, bees, honey jar, bee hive and so much more plus dies to go with each of the images.  

A complete set for creating a beautiful scene.  


I love making interactive cards so this one is no surprise that I made the bees buzz around.  I stamped each of the images onto copic friendly paper and colored with copic markers listed below.  I die cut each of the images with the corresponding dies, included in the set, and placed them aside while I built the base for the card.  
I used the #5892 Easter S2 paper pack and the largest #5062 Rounded Rectangle A2 Double Stitched die to cut the pattern paper.  Then I used two circles from the #5064 Double Stitched Circle dies to cut the round track for the bees to buzz around.  I placed foam tape behind the circle as well as the rectangle, making sure not to place too close to the outside of the circle so the bees can spin, and adhered onto a black cardstock background.  I slipped a dime (or disc, thin button, etc.) under the track and placed a square pop dot, cut in half, on top of the dime.  Then I placed two bees on top of the foam dot.  I used two bees so that I could hide the dime from showing.  

After making the mechanism, I decorated the rest of the card using the images I had colored and die cut.  I created the grass using a die cut and patterned paper from my stash.  I also used the Rounded Rectangle A2 die to cut the bottom portion of the grass so it fit nicely over the striped base. I glued the stem portion of the flowers underneath the grass and popped up the flower portion using foam tape.  Lastly, I stamped the sentiment, from this same set, and die cut using the #5135 Hexagon Double Stitched Die set.

That's my card for today!  Hope you play along with us and enter your creative card/project into the challenge.  You could win a free stamp set and who can say "No" to that.  

Have a great day and enjoy creating!

Copics used:  N2, N4, N7
E21, E23, E25, E27
Y11, Y13, Y15, Y17
YG41, YG45
B0000, B000
R02, R05


Monday, June 10, 2024

Seas the Day by Sharon Caudle

 Hello AI Fans! 

I hope you enjoyed your weekend and it was full of fabulous weather! For those of you lucky enough to either live close enough to, or were able to visit the beach, I'm totally jealous! LOL! I had a fun time coloring up this colorful car from #5455 Birthday Buggy Set from the line of Rides at Art Impressions. And instead of using all the Birthday stamps that comes with it, I chose to grab #5509 Beach Accessories set. I might have given away my age by the way I colored it. LOL! Who remembers all the cute bugs around the 60's and 70's with flowers painted on them? I couldn't resist, so I grabbed #5739 as it had the perfect sized flowers for the car door. For the sentiment, I used #5399 Gull Friend Set. I started by stamping all the fun images onto Copic friendly paper and then colored them with Copic markers which are listed below. I created a beach scene by just grabbing some dies from my stash. 


Thanks so much for stopping by for a visit and until next time - stay crafty! 


Copic markers used:
Y35 and 38
YG01 and 03
B00, 02, 04, and 06
R22, 24, and 27
YR04 and 09
E33, 51, and 53
C3, 4, and 5


Thursday, May 9, 2024

Fun Gulls by Dori Mendiola

 Happy Thursday AI Friends

I have a fun card today that fits with the May Guest Designer challenge - "Anchors Away".  See the tab above for details.  I hope you will join in and play.  It's very easy, fun and you could win a free stamp set plus be a guest designer for a month.  


First I started with the background by ink blending distress oxide twisted citron and broken china onto a 4 x 5 1/4 piece of Strathmore Bristol Smooth cardstock.  I misted with water to create the water spots and then partial die cut with a wave background die.  I used a piece of kraft cardstock for the beach and die cut with a hillside die.  I spotted with copic markers to mimic sand and the background is complete. 

Next, I stamped several images from the #5399 Gull-Friends set onto cryogen white cardstock  and colored with copic markers (see below for colors).  I die cut the images out with the corresponding dies that come in the set.  The tree stump is the log, turned sideways, from the #5055 WC Sitting Places set.  I stamped, colored and fussy cut two of the logs.  Trimmed a bit off the top of one of them and placed it at a slight diagonal just behind the other one.  I used foam tape to give it dimension and tied them together with twine.   The anchor and the flying seagulls are from the #5325 Sail Mini dies.  The sentiment is from the #5399 Gull-Friends set stamped onto a 1" circle die cut from the #5064 Double Stitched Circle dies.

Thanks for stopping by and I hope you will join in on the challenges going on this week.

Have a great day!

Copics markers used: 
C00, C1, C3, 
E53, E55, E57, E59
R20, R22, 
Y13, Y15, Y17, 
B12, B14, B16
YR12, YR04, YR07, YR21, YR24
YG21, YG23, YG25

Saturday, January 20, 2024

Baby, It's Cold Outside! by Janet


 It sure is cold across much of the US and Canada this weekend so I thought it would only be fitting to make a card to acknowledge it. I would say celebrate but.....that's probably the wrong word right? Brrr! I hope all of you have a toasty house and plenty of warm drinks.

I used several die sets for this one. I created the shaped background using the largest page die in the 5768 - Decorative Journal Page 1. It's an unusual use for it but it works great on the card. I trimmed off the edge that is intended to be folded and put in a journal. When applied to the edge of the card, it makes a nice shaped sky for the snowman. This pudgy snowman and his bird friend are from 5351 - Chubby Snowman Set. I colored him with Copic markers. The sentiment is also in the set. I heat embossed it with silver on a circle cut from 5064 - Circle Double Stitched Dies. I made the flurry of snowflakes in the background using 5353 - Lg Snowflake Dies with white glitter cardstock. Finally I added a floss bow, blue enamel dots, and iridescent sequins. It's an icy but cheerful scene. Perfect for what I had in mind!

Thanks for stopping by today. I hope you'll stop by the store to see all the things you need for your card, journal, and tag making projects. 

Janet YouTube - Blog - Facebook - Instagram - Pinterest  

Sunday, January 7, 2024

Card Set by Karen Day

 Hello Ai Watercolour Fans!

I am kicking off the Watercolour Weekend posts for 2024 with a set of five cards.  I have a brother-in-law who is a 'birder', so when Ai first came out with all of the bird freebie stamps, I knew what I'd be doing with them!  He's also a big fan of my cards, so here's what I've made for him (scroll down to see them individually):


I started by die cutting my Canson XL Watercolour paper using the 5061 - Square Double Stitched Dies, and the 5064 - Circle Double Stitched Dies, keeping in mind that some of the birds are larger than others, and I wanted a variety of shapes to keep the set interesting.  All of the birds were coloured with Tombow Dual Brush markers in #969/565, and then filled in with various other colours.  *In order to colour them up accurately, I Googled each bird so that I would have a photo to follow!  For each one, I added a little greenery/foliage - several using stamps, and some were hand drawn (the chickadee's leaves).  I kept everything really simple, as I wanted to keep the focus on the birds - so I used a wash of #565 on each, to suggest the sky.

When assembling them into cards, I matted each image with a darker colour to frame it, then chose some subtly patterned papers from my stash as my card bases.  Since they're all for a fella to hand out to friends and family, the card designs were fairly plain, without a lot of extras.  I stamped sentiments from 5735 - Birthday Sentiments Set onto the Canson paper, or right onto the backgrounds using Versafine Onyx Black ink.


And now for a last minute addition to my post... I'd painted a 6th image, and no matter what I tried, I couldn't make this one 'blend' in with the other cards to be part of the set... it honestly had a life of it's own.  You'll see what I mean - here is the sweet little hummingbird:
I persevered, and made it into a card that was a little more vibrant than the others!

*Don't forget that the Watercolour Design Team will be sharing here on the blog and other social media every Sunday, all year long!  We look forward to bringing you new inspiration each week.

Tuesday, October 17, 2023

Halloweenish Fall Scrapbook Layout by Nina

 Hello Ai fans, Nina here with a new Fall Halloweenish project :) so I am creating this layout using the Autumn Owl Cubbies Stamp and Die Set.


I originally wanted to create a Fall themed layout with a little scary Halloween accent. Let me show you what I mean.
So I stamped my images using my Mini Misti and Memento Tuxedo Black Ink and colored them with Copics.

Copic Shades:
Yellowish Pumpkin: YR68 YR04 YR38 YR17
Orange Pumpkin: YR09 YR68 Y38
Beige Pumpkin: E43 E42 E40
Doors: E99 E25 and door accents: R39 E19 E09
Tree: C9 C6 C4 W10
Greens: YG23 YG01 YG67 YG17
Blues: B06 B04 B02


I then cut all around my pumpkin house and backed it with foam tape.

For the owls I cut a circle around them using my Double stitched Circle Die Set and colored then with green Copics (YG23 YG01) and yellow (Y08 Y06). I attached these circles to slightly bigger black circles to make stand against the background.

I used a yellow paper for the background and attached a strip for the ground then attached my pumpkin house on top along with the circles of the owls.

I then attached the whole panel to a shocking pink color scrap of paper and embellished with enamel dots and star stickers of matching colors.


Monday, September 4, 2023

WC Animal Planters by Sharon Caudle

Hello AI Fans!


I've got a card for you today that is for the Feeling Blue challenge going on right now.  I used 5521 WC Animal Planters, 5794 Whimsical Flowers Set, 5064 Double Stitched Circles Set, and 5543 Journal Template Die Set. I stamped the images onto Cryogen white paper with Memento Tuxedo black ink and colored them with Copic markers. These little cuties are great for Copic coloring too! To get the teddy bear texture on him, I simple dotted around his image with my Copic blender pen after I colored him. Easy Peasy! 


Thanks so much for stopping by for a visit and until next time - stay crafty!!

Copics used:

E21, E23

G21, G24

B000, B41, B45

Y23, Y26, Y28


Saturday, August 12, 2023

No Bait-ing Around! by Janet

My husband and brother-in-law love to fish together and these guys really remind me of the two of them. They're only 13 months apart and are as close as brothers can get. The boat with the guys and the fish are from 4900 Reel Great Guys. If you have any guys in your life that enjoy fishing, this is a great set for all kinds of occasions.

I stamped the boat image on an A2 alcohol ink friendly cardstock and then colored it with Copic markers. After coloring in an upper level of water, I cut two cardstock waves and layered them below the boat. Then I cut another cloud border for the top of the card. I created a sun by stacking two of the smallest 5064 Circle Double-Stitched Dies. I stamped, colored, and cut out the fish image and adhered it to the card with foam tape. The last touch was adding the boat name with a black fine tip pen.

Thanks so much for stopping by today and don't forget to enter your tag in our challenge. I hope you'll stop by the store soon for all your card and tag making needs.


Janet YouTube - Blog - Facebook - Instagram - Pinterest 

Saturday, August 5, 2023

More Candles? Just Get a Bigger Cake! By Janet


The newest challenge on our blog calls for tags. I love making tags so this challenge is even more fun than normal for me. Today I've made a free form water-colored cake in pinks and purples. This cake comes from 5255 Birthday Cake Set. It has many cakes of different sizes and even has a cupcake, a cake slice, and a candle. There's sure to be a cake in this set that fits your card or tag if a cake is what you're looking for.

To color the cake, I stamped it on water color paper and then used Tombow Dual Brush Pens #565, #636, and #725 mixed with water. All three of these are part of Bonnie's 5137 Bonnies Favorites Set 1. I randomly dabbed the colors being careful not to mix them too much as I wanted the colors to be distinct. I added Nuvo Crystal Drops in yellow for the candle flames and sprinkled some yellow glitter on them for good measure. The texture and shine on the cake comes from covering the cake with embossing ink and Ranger Bridal Tinsel in zig-zag patterns so areas are either glossy or glittery. It gives the cake a more interesting look than leaving it plain. I cut out the cake image after everything was dry and set it aside to make the main tag.

I used the largest tag in the 5132 Tag Stitched Dies Set and cut it in white and in metallic gold. I cut circles randomly in the white tag with the smallest circle in the 5064 Circle Double Stitched Dies. Then I adhered it to the gold tag. This is a simple way to create a faux foiled look with no muss or fuss. Once done, I stamped and heat embossed the sentiment before cutting it out with the 5062 Rounded Rectangle A2 Double Stitched Dies. The sentiment is from AiCS28 Chocolate Therapy. I edged the sentiment in pink ink to make it stand out a little more from the white tag.

I applied 2 layers of foam tape to the cake and adhered it to the tag. Then I adhered the sentiment directly to the card. I added two paper flowers set with a lavender jewel brad and added some purple and pink jewels and pearls. Last I added bakers twine to the tag and a pink and white twine bow. 

Thanks so much for stopping by today and don't forget to enter your tag in our challenge. I hope you'll stop by the store soon for all your card and tag making needs.


Janet YouTube - Blog - Facebook - Instagram - Pinterest